A loyal reader and I have been trading emails over the last few days about the pitfalls of traveling with a bike. The nice thing about having a website that gets read by dozens of people annually is that I get to communicate with some of them, and they provide good ideas. Mark expressed some frustration at the hard lessons learned in his first experience traveling with coupled bikes, and we traded a few pointers. He and I both realized that although there are many sites out there that discuss bike travel, few tell you the nitty-gritty about actually packing up the bike.
As it turns out, even though flying with bicycles has been going on for quite some time, there’s not much for comprehensive how-to guides on teh interwebz, so this post will try to address some of that shortfall. Settle in, dear reader, this will be a long post.
Let’s start with the obvious: you need a bike. Of course, you can rent at most destinations, with prices ranging from $20 to $150 per day, depending on bike and rental shop. Clearly, this is great if you are trying to sneak in a day or two of cycling while on a longer trip. If this is your plan, you can stop reading here and go search out bike rentals at your vacation spot. Take your pedals, helmet, chamois, and maybe saddle, and have a great time. Note that you can also rent all of those with the bike, but rental chamois sounds downright nasty.
Next, you’re going to need an airplane. On their own, airplanes are expensive and require quite a bit of maintenance, but there is a simple and over-priced system that will not only rent you a small, cramped seat, but will also overcharge you for your luggage just prior to losing it. As a bonus, you get to sit next to someone who will hog the armrest.
Boy, if that doesn’t sell you on traveling with your bike, nothing will.
Size Matters
Airline regulations and prices are constantly changing, in 2019 American and Delta dropped extra fees for bikes, but before you travel, make sure you check you airline’s prices and regulations. Maximum bag sizes have changed as well, with the maximum being overall dimension (H+L+W) of 62″. Beyond this, you may pay an oversized fee. Again, check with your airline.
One unchanged and hard rule is 50 pounds- regardless of size, if your bag is over 50lbs, plan on busting out your wallet. There’s no way to sweet talk your way past the scale, so weigh the bag at home and always leave a bit of extra- I try never to let my bike bag get over about 47lbs. This may have an impact on how much extra kit and stuff you cram in with the bike. Large cases may allow the room, but the mass may be an issue. Repeating the same packing and contents carefully on the way home is important as well so you don’t get a surprise fee.
Bike Choice
I’m a fan of metal bikes in general, and I feel fine traveling with both coupled and uncoupled bikes. Carbon is nice, but if it gets cracked in transit, you’re out of luck. A dented metal frame is a definite bummer, but it’s not catastrophic. Similarly, I like metal wheels for travel, I know carbon rims are durable, but in most packing scenarios, the wheels are outboard in the case and will take the first impact.
Component choices can also affect your trip- having oddball freehub bodies, proprietary spokes, special shifters, or what-have-you may mean that replacements are not available. Shimano and DT Swiss freehub bodies are ubiquitous and easy to find, as are Shimano brake pads. Uncle Krusty had trouble finding Campy road brake pads once when we traveled in Europe, so even though Campy is a major component manufacturer, it’s no guarantee that you can find parts.
Mechanic’s skills are important, but should not stop you from traveling with your bike. If you’re not comfortable doing basic work (adjusting derailleurs, brakes, changing a flat), many bike shops offer classes. Consider taking some lessons before your trip. There are also some phone apps which show how to fix bikes, you may find these helpful. Remember, you may be a long way from a bike shop, or one where you can easily communicate.
I’m a fan of eTap due to the ease of removing the rear derailleur, but a mechanical shifting kit with cable couplers is just as easy to disassemble. It’s important that you know your system and can make minor (or major) adjustments yourself, so take a grouppo you are comfortable with.
You don’t need a dedicated travel bike, but you do need a bike that fits you well and that is reliable and solid. Hopefully you’re planning on lots of riding, so your saddle height, bar position, bar rotation, and so on are important so that you are comfortable on your ride.
Clothing & Kit
Please, please, take clothing. World Naked Bike Day is a thing, but really, your thing does not need to partake in the event the remaining 364 days of the year. Take some kit, but really, only about 1/2 of what you think you need. The basics are:
- Bibs or shorts
- Socks
- Jerseys
- Rain or wind shell
- Gloves (long or short finger, depending on season and preference)
- Vest/Gilet (for traveling in France or wearing Rapha)
- Helmet
- Glasses
- Arm Warmers
If you take some soap, such as Assos Kit Wash, you can wash your kit post-ride. Wear it straight into the shower, give it a good rinse, and then transfer it to the sink. Add a capful of Kit Wash, then knead it and mush it around until the sink drains itself (I don’t think there’s a hotel sink on the planet that actually holds water for more than a couple of minutes). Rinse, again filling the sink and mushing the clothes around until it drains again. Repeat a few times. Now, lay out a towel flat, lay the clothes on it one at a time, roll the towel up, then twist it up super tight (stand on one end) and wring the water out. Hang the clothes up, they’ll be dry by morning.

By using this method, you can get away with 2-3 sets of bibs/jersey/socks, even for longer trips. Do make sure you rinse very well, my friend Uncle Krusty learned that a chamois with soap residue and a hot climb up Alpe d’Huez was a recipe for chafing; he spent the next 2 days trying not to touch the inside of his clothes. Don’t be Krusty.
Other Goodies
This sort of depends on how fussy you are with your bike, travel, and kit. Me: 10 on the Fussy Scale. Uncle Krusty: 1 on the Fussy Scale. As discussed here, I take tools and spares on every trip, and I’ve been happy to have them when I needed them. I’m fussy enough to have gone through the frameset and changed as many bolts as possible to use 5mm wrenches. It saves time packing and unpacking by not having to change wrenches. This may seem a bit OCD, but when traveling with my family, I pack and unpack 3 bikes, so saving a few seconds per tool swap adds up.
You can go through the other post and read the descriptions of the tools and spares I like to bring along. They have saved a few sheepish trips to the bike shop.
Before you pack, Clean the damn bike. Seriously. Wipe it down, check the shifting and the brakes, check the wheels for wobble, make sure the pedals spin. Clean, wipe,and relube the chain. Put the effort into getting it showroom-pretty, you will thank yourself on arrival.
Pay special attention to your chain. Clean it, especially if it’s black and gunked up. I use hot paraffin to lube mine, it leaves the chain clean to the touch. Waxing a chain is easy, just use a small CrockPot (about $16 on Amazon), throw some Gulf Wax inside (check the canning aisle at your local grocery store or Walmart, a pound is about $6), plug it in for 2 hours to melt the wax, soak the chain it in it for 15-20 minutes, pull it out, let it cool, and return to the bike. It’s worth owning a pair of Wolftooth Chain Pliers for travel- they are light, inexpensive, and work great on master links. Remember to take a couple of spare master links along as well.
Case Selection:
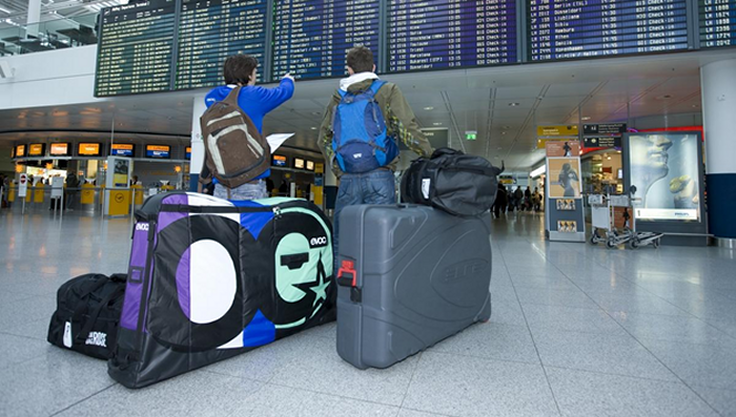
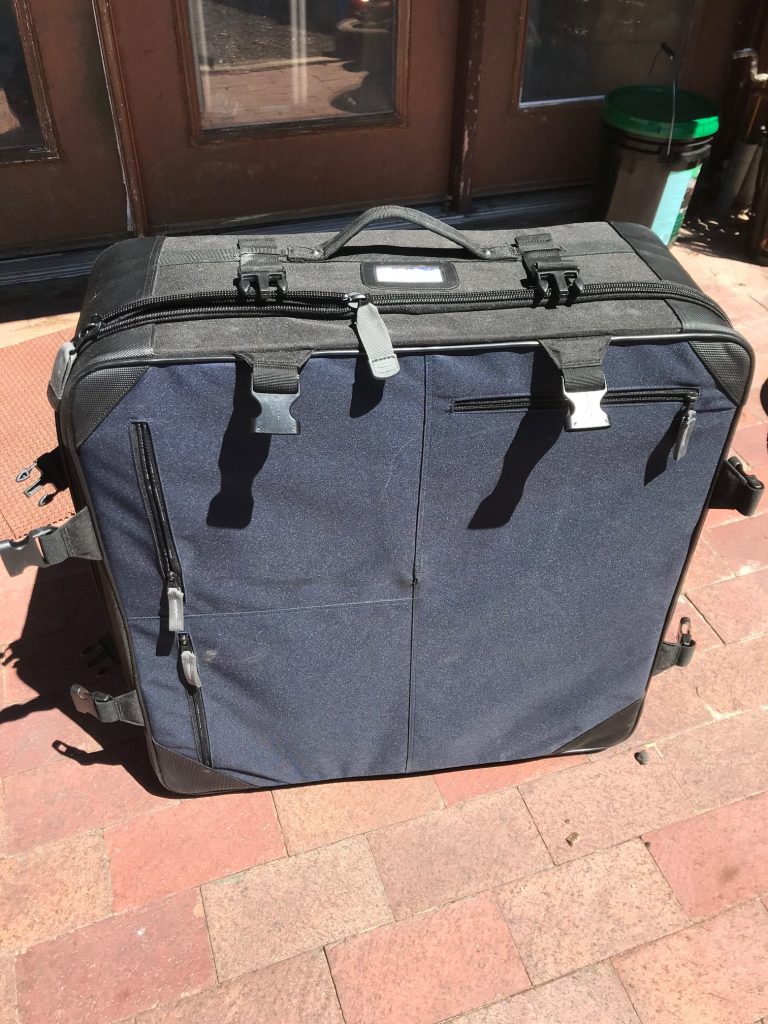
You have 3 basic options: Full Size, Mid Size, and Compact. Full Sized cases such as hardshells, Evoc, Scicon, and the like are easy to pack and generally have less disassembly, but are more unwieldy in airports, buses, trains, and rental cars. They can also eat space in a hotel room quickly, although some will roll up and save some space.
Mid Sized cases like Eep and Orucase are a bit more forgiving than the Full Size cases, but can be more difficult to pack.
Compact Cases for coupled (S&S or Ritchey) frames are the smallest, but require the most work for packing.
You’ll have to make a determination on bike and case combo based on your travel goals, mechanical skills, airline constraints, space available at your destination, budgets, and so forth. I’ve traveled with hardshells, mid-size, and compact cases, and I like the compact bast for logistics- I find it easier to negotiate trains and rental cars with the smallest case size available, but I also don’t mind the extra effort for packing.
Field Logistics may also be a consideration, if you’re going point-to-point you may need to store or pay for your case to be transported. There are usually a variety of services available in most areas, so do your research. Some services may charge more for larger cases, or storage may be limited.
Travel Bike Condition 1: Road Bike, Hardshell Case
For the sake of argument, we’ll skip over mountain bikes here, for 2 reasons. First, the issues are essentially the same regardless of bike, and second, I really don’t feel like packing my mountain bike up for the sole purpose of taking pictures of how to do it. I have an S&S bike kicking around here that is much easier to deal with for photos in this post.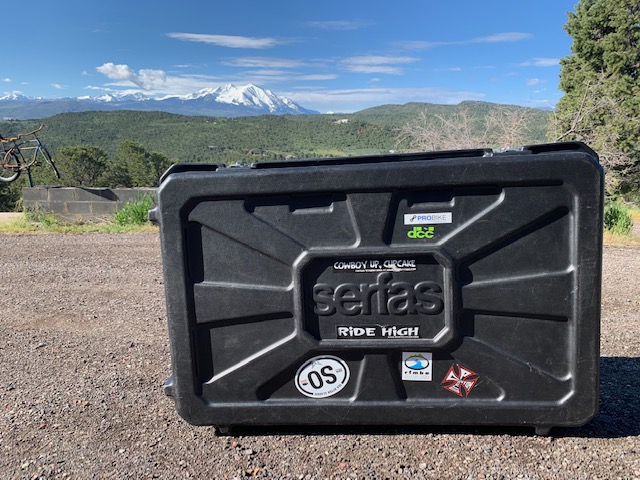
Also, the process of packing in a hardshell versus a soft full-sized bag (Evoc, Scicon, Eep, etc) are basically the same, so for this discussion, we’ll use the Serfas case I have on-hand. We’ll also assume you’re not considering doing this in a surplus cardboard bike box you bummed from a shop. That actually works fairly well, but only once. It makes sense if you’re going point-to-point and can’t transport the case (though there are storage and transport services available, do your research) or selling/abandoning the bike after the trip.
Full-sized cases cost $300-700, so before you run out and buy a new hardshell or soft full-size bag, shop around. Consignment shops often have these in good shape for big discounts, often having only traveled once. Craigslist and eBay also have used cases available, and some bike shops will rent them to you. Ask your friends as well, some people will loan them to you. Mine is available for a case of beer per trip. Good beer only, please.
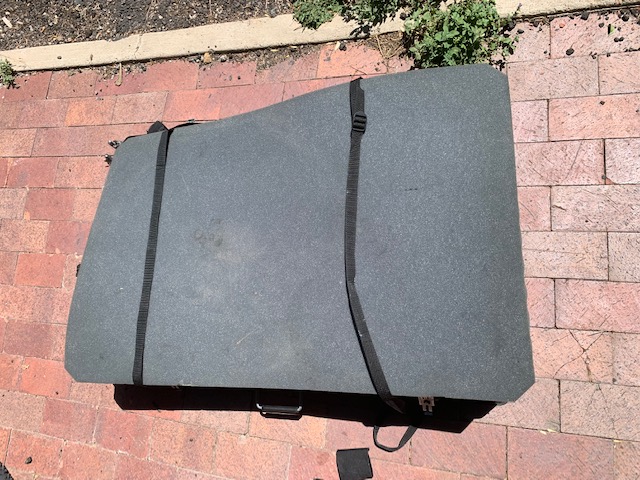
Keep in mind these things are big, and dealing with the case on subway trains, small rental cars, escalators, and so forth can be a huge hassle. They can also be heavy, weighing close to 20 lbs. This is important, as you really want to keep the total weight under 50lbs to save on fees.
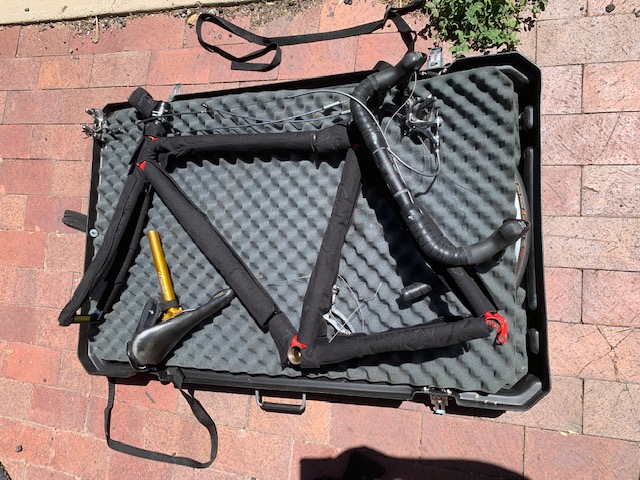
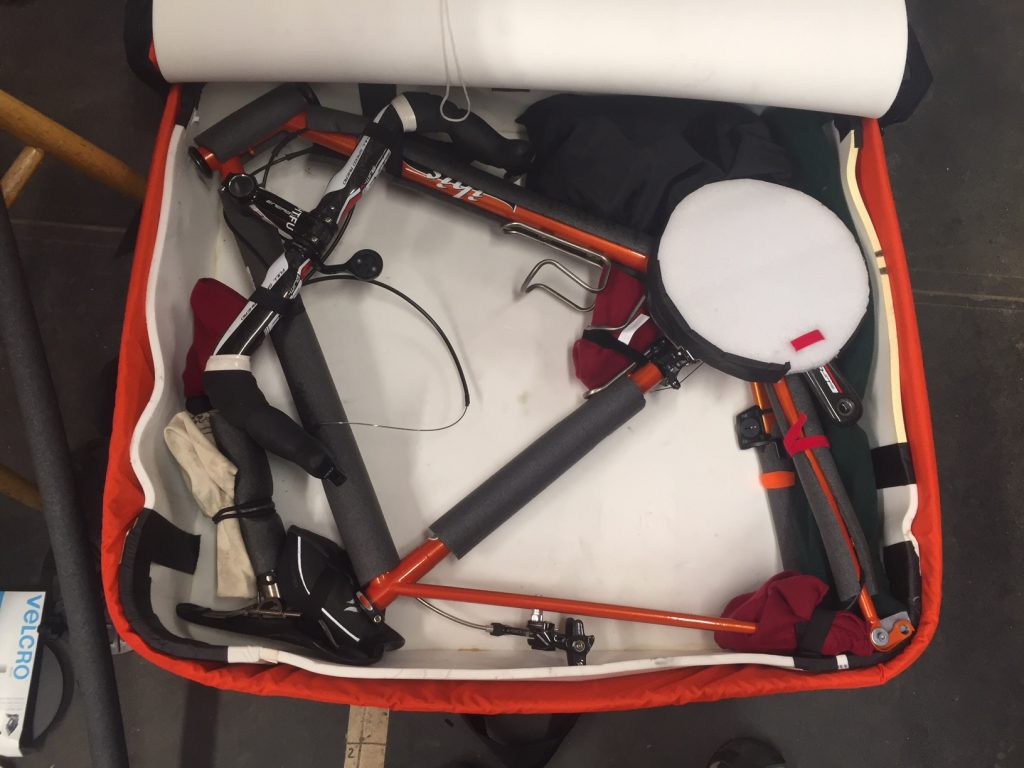
The basic process of packing these cases is the same: remove the seatpost & saddle, handlebars, pedals, and wheels. Some versions will pack both wheels on one side of the case, some will pack a wheel on each side. Remember to practice this and to allow a few hours to figure it out- doing it at midnight before your 8AM flight is a really bad idea. Once you get it figured out, take photos.
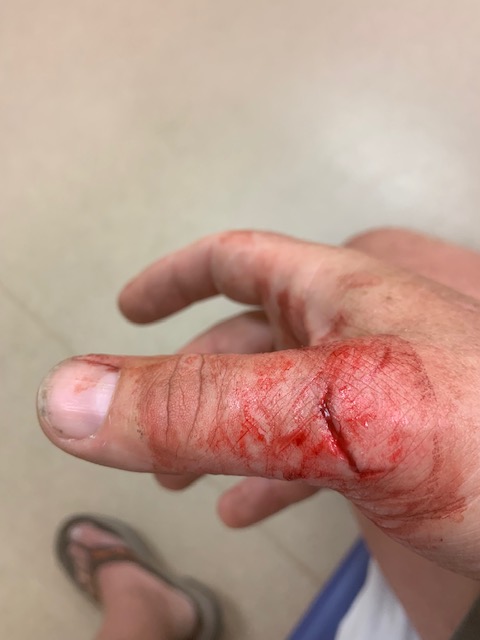
To remove pedals, put the crank arm forward, put the wrench on the pedal spindle (either on the flats on the outboard side or a hex on the inboard side). Push downwards and aft. If done properly, the wrench will slip and you will shred the skin off your knuckles. Once you’ve cleaned up the blood, call your doctor and check how long it’s been since your last tetanus shot, then find a piece of duct tape for your wounds and put the chain on the big ring. Next time, you’ll remember to do this first. This is also a lesson in not over-tightening your pedals. Note that the wrench always goes aftwards to loosen the pedals, regardless of which side of the bike.
I also recommend removing disc rotors as they can be bent fairly easily. You will quickly decide that CenterLock is the way to go.
When you remove the bars, you can decide if removing the faceplate or stem is better for you. Use a marker to make a dot at the faceplate split so you can get your bar rotation back to where it was. If you have carbon bars and/or steerer tube, bring along a torque wrench for reassembly.
I strongly recommend removing the rear derailleur and maybe even the hanger (if it’s removable). Even if you leave the chain on, you can still save yourself a lot of headache and heartache. Use velcro straps to lash it to the chainstay.
You can wrap the frame tubes in pipe insulation or use the velcro’d neoprene wraps common on S&S bikes to protect the frame from scratches or denting. Cut fabric to fit each tube, then use a silver Sharpie or similar marker, and label it.

Now is a good time to consider knowing your spoke length and bringing spare spokes. You can expect 3 sizes per bike, sometimes 4. Spokes are cheap, but measuring them in situ is a pain. Some wheels have the spoke lengths written on the rim labels; if you build wheels, I know you are writing the spoke lengths on the rim bed. Of course you are.
Here is a sequence for packing a frame into a hardshell case. Remember, your situation will be similar, but different. EVOC, Sciocon, Eep, and so forth are similar, except the bag is on edge and you load from the top. I might have mentioned this: practice. Don’t do it the night before you fly.
Packing large cases is pretty easy: Pad the frame, lash the bars to it, lash the rear derailleur to it, and place it in the case. Remember to tether everything down- your case is laying flat on the floor now, but won’t always be in this position and you don’t want stuff rattling loose.
A note about wheels: you really do not need to deflate your tires. Airplane holds are pressurized, which explains 1) why your shampoo didn’t explode, and 2) why your pet can survive the trip. There’s no real reason to deflate your tires. If you have tubeless setups, you really don’t want to deflate them and unseat the beads.
Travel Bike Condition 2: Road Bike, Smaller Cases (Orucase and similar)
Really, this isn’t much different than the large cases, except you also remove the fork. Again, practice, practice, practice. They tend to cost in the $400-500 range, and can be size-specific, so know your frame dimensions before ordering. They will also tend to be lightweight, sometimes under 10 lbs.
These travel cases are much smaller than the full-size hardshells, generally only a couple of inches bigger than a case for a coupled bike. They are much easier to fit into a car and hotel room. Some use backpack straps; mine have wheels on one end.
If you have a caliper brake, use a 5mm wrench to remove the nut from the back of the fork crown. If you have IS disc brakes (bolts are perpendicular), remove the 2 bolts so the caliper and adapter come loose, allowing the cable to come free of the fork. If you have post-mount (bolts are axial to the bike), or flat-mount, you might want to leave them on to save the step of re-centering on the rotor. If your brake line goes through the fork and is hydraulic, well, you’re screwed because you might not have enough slack in the line to remove the fork, and you certainly aren’t going to re-bleed in your hotel. If you have this condition, get thee to a bike shop, fast, and have a longer hose installed.
Make a note of how many spacers are below your stem, then remove the bolt in the center of the top cap and the cap. Loosen the pinch bolts off the steerer tube and slide the stem off the steerer tube. Remove the spacers and top cap, then the bearing cartridge (note its orientation, usually the chamfered side goes inwards towards the center of the headtube). Drop the fork out of the head tube and slide the lower bearing off the crown race. Put all these itty bitty parts in a ziplock bag or loop a ziptie through them, then pack the bike in the bag.
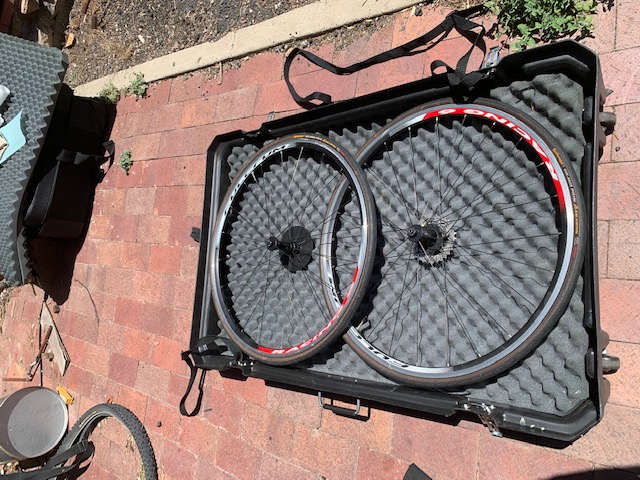
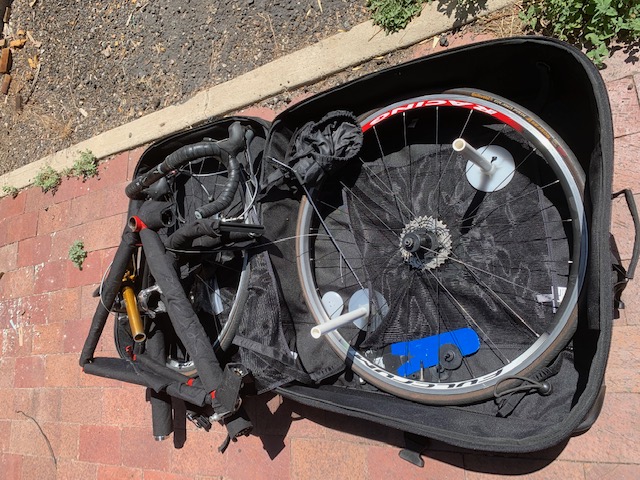
Typically, these cases pack one wheel on each side of the case. Pull the quick releases out and bag them with the other goodies, remove the rotors, and slide the wheels into their pockets. You will need to experiment to see if putting the wheels in before or after the bike works better. Odds are that putting the cassette inboard will help you pack flatter. You’ll see that the bag has an inevitable bulge at the center from the hubs, so try to wiggle the wheels in off-center to reduce this.
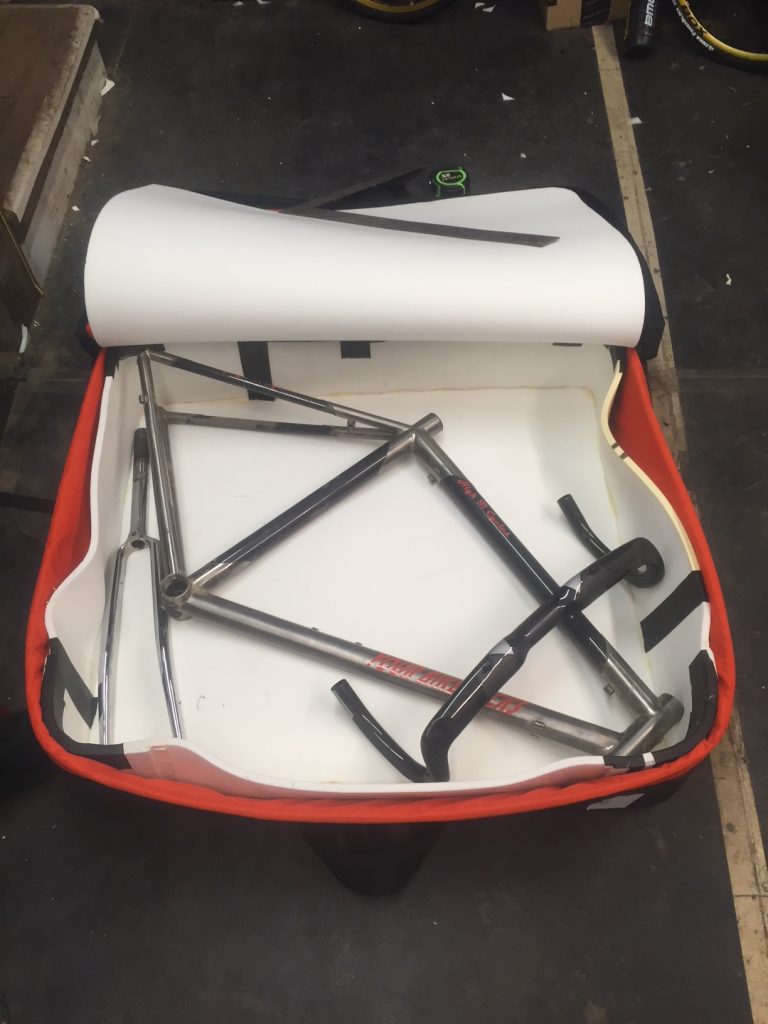
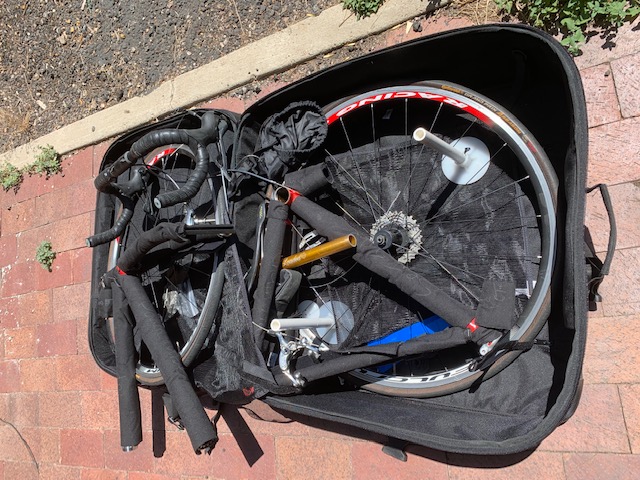
Travel Bike Condition 3: Road Bike in S&S or Ritchey Case for Coupled Bikes
At 26″x26″x10″, these are the smallest cases that you can get, and they meet the maximum dimensions the airlines allow (62″). The weight for these cases is 17-19lbs, so take care as you pack to keep them under 50lbs. This can often mean your shoes, helmet, and small accessories go in your suitcase.
Packing a coupled bike adds a few steps, but it’s all just variations on a theme when packing coupled bikes versus regular bikes. As above, you will remove bars, pedals, rear derailleur, and seatpost. I find that flipping the bike over and loosening the couplers first helps with disassembly. Different sized bikes may require fork removal (see above). I’ve seen people remove cranks, which to me, seems excessive.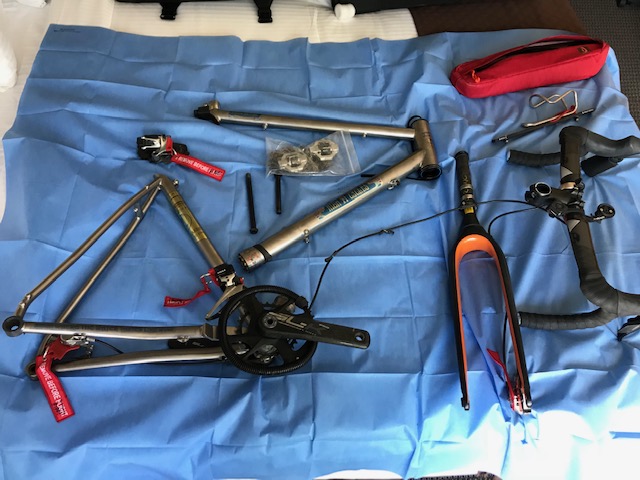
This is where practice is critical. You really need to set aside a few days and a lot of alcohol to get the disassembly and packing sorted out. Swearing loudly and often will also aid the process. Each frame is a bit different with placement of the couplers, top tube angle, head tube length, and so forth. So, these photos are just a suggestion, you will end up with something completely different for your bike.
Again, tube pads are good, the TSA cargo net is good, and you may want to add the stiffener kits. All are available online, and are easy to find on eBay. Cable couplers also help, and can serve as barrel adjusters in a pinch.
Wrap the bike up carefully, with all the bits and bobs here, something will scratch. It might be the lever blades rubbing on a spoke, it might be the stem rubbing on an axle. Cover everything you care about.
Here’s a sequence of a frame in a Co-Motion case. S&S Hardshell cases are similar. Remember, your bike will be different, so practice. Lots of times.
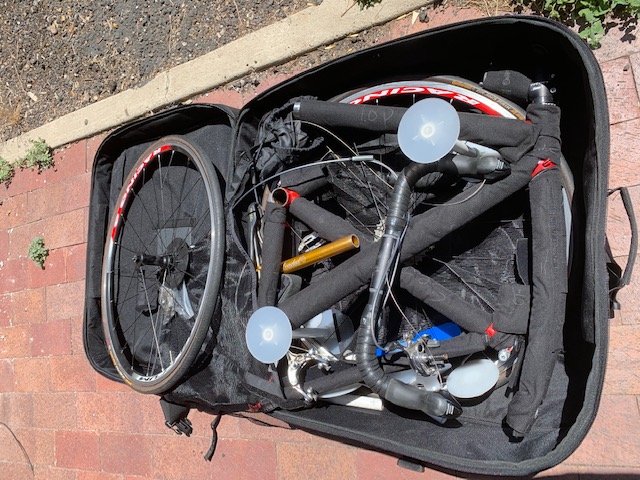

Once you have everything taken apart and a huge pile of parts that used to be a bike, you get to work on a puzzle that is harder than those pub-puzzles on steroids. Mainly, because with a pub-puzzle, you can say; “fuck this,” and set it aside, hand it off, or throw it out the window. With a bike, especially if you own it, you are committed. After you get through about 2 million permutations of how to fit everything inside, without forgetting something (hint: put everything in the lid, then move it to the base part as you pack), make damn sure you take several photos. Print them out and laminate them, then put them in the case. You’ll thank yourself on the re-pack before you head home.

With a bit of practice, you can get the disassembly process down to 20-30 minutes. Be aware that each time, not only do you get better at it, but you will also find a slightly better way to do it. Keep taking photos.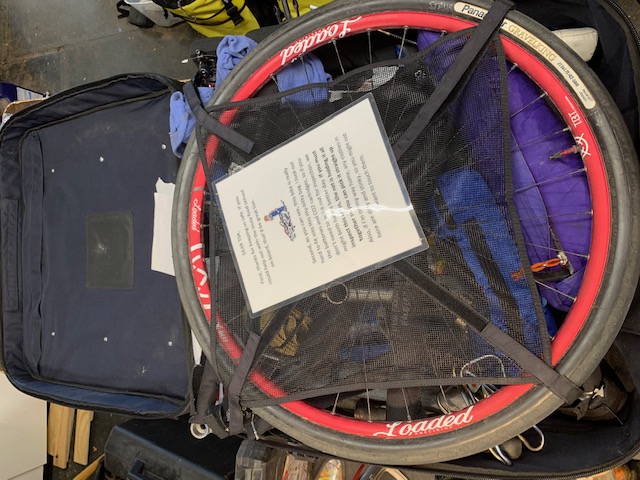
Other Bags and Airplane Pits
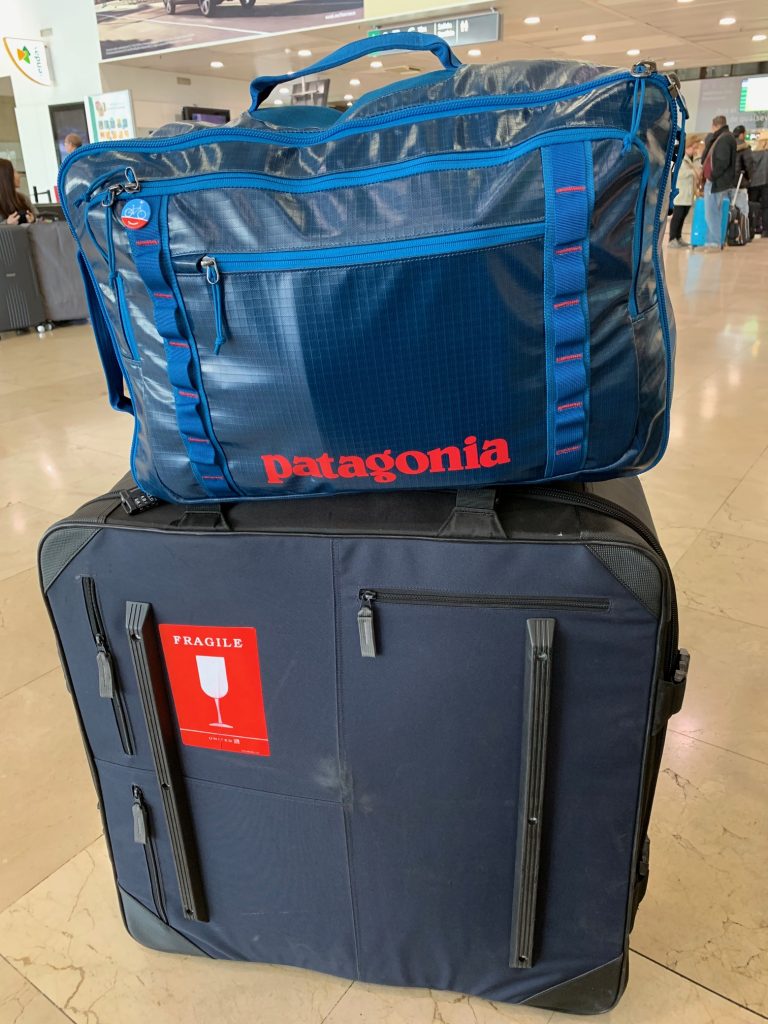
As covered here, I like the Patagonia Black Hole bags. The duffels are great for swallowing huge amounts of gear, while the MLC is slightly more briefcase-like, with better pockets for organizing stuff. By all means, use packing cubes to sort and compress your stuff, and do your damnedest to get everything into a carry-on sized bag. You’ll be much happier in airports, taxis, trains, rental cars, escalators, and so forth if you have small bags.
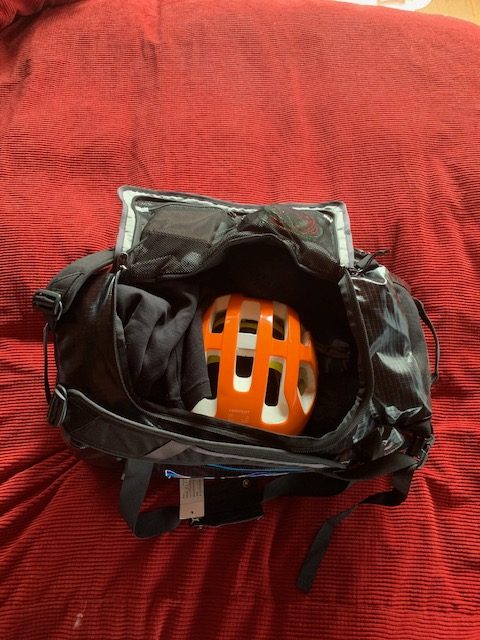
I also like to bring mini-backpacks that fold into themselves. These fit inside my Patagonia bags, and I can easily pull them out to hold a pillow, book, iPad, glasses, etc in the event I check my bag.
Let’s also re-visit how all of this stuff will actually get on the airplane. As discussed on other posts, I am gainfully employed as a part-time, seasonal ramp agent for a regional airline. This is to say that I throw suitcases around a small airport for about 20 hours a week, 6 months a year. As a benefit, I get sore shoulders, blackened fingernails, and I can fly places with my family and our bikes.
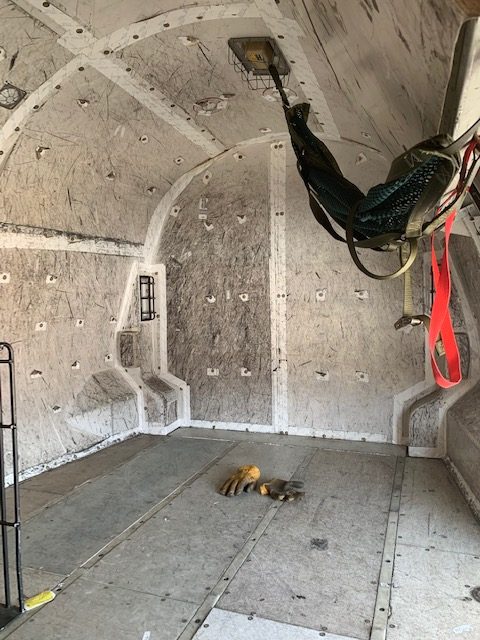
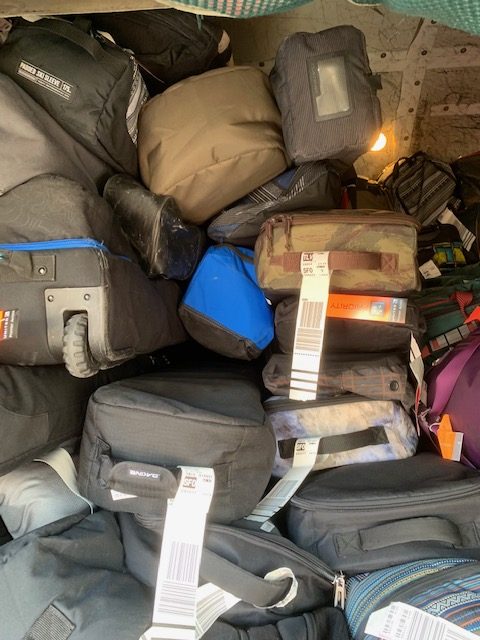
Full-sized hard shell cases like the Serfas are going to end up on the bottom. They just are. Each time you load the airplane, it’s like a game of Tetris. Bags come up the belt loader to you, and you have to pack them in tightly. You have little or no control about the size and shape of what’s coming your way, unless you really get along with your co-workers.
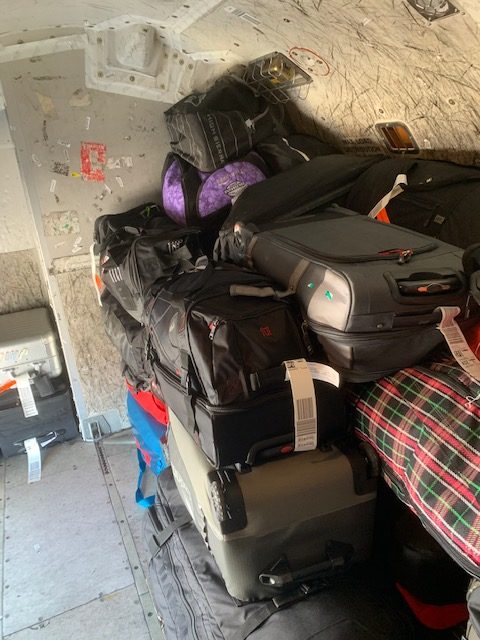
S&S sized cases, both hardshell and Co-Motion, are probably going on the bottom of the pile. They are easy to stack and fit in with standard bags reasonably well. Soft cases like the Ritchey will go higher up in the pile, because stuff won’t stack well on top of them.
Orucases and Eeps will probably go against a wall or on top, as they are too soft and irregular to go into a stack. EVOC, Scicon, and similar will also go against a wall or on top, because they really don’t stack.
The baggage handlers don’t care that it’s a bike, they are more concerned with getting everything inside the airplane within the allotted time. As such, they will be concentrating on packing things in tightly to maximize their space. The tighter the load, the higher the odds are you can get everything in. Things that stack will get stacked, sometimes on edge, sometimes flat, and always with tag outwards and wheels off the deck.
To put this in context, at my airport, we get 28 minutes to unload a 70-passenger airplane, deliver the bags to the carousel, bring the new bags up, load them, collect the carry-on bags dropped at the bottom of the passenger ramp, fill out the paperwork counting the bags and their weight, empty the lavoratory tank and refill its flushing tank, get the passengers loaded, connect the pushback tug, and shut the door. For some flights, this can mean unloading and re-loading up to 120 (each way) suitcases of varying sizes and shapes each way. In this process, we will try to keep things from falling off the belt loader, try to keep things marked “fragile” well protected, and pack everything as tightly as possible. We’ll do this for 20-30 flights per day, with a crew of 3 people, 4 if we’re lucky.
That said, we make no real promises as the radios crackle “5 minutes left!”. Keep this in mind as you pack. Don’t let things rattle around inside the case, and make sure all overlapping parts are protected from each other with padding or wrap. We won’t try to damage your bag, but we have to move fast and pack the pit tight.
2 Replies to “Traveling With a Bike Sucks, Part II: How To Ease The Pain”
Comments are closed.