The Beginning
“Hi, this is Chris, I’m returning your call.” About the only way I would have been more flabbergasted was if he had said, “Hi, this is Elvis, and I’m still in the building.”
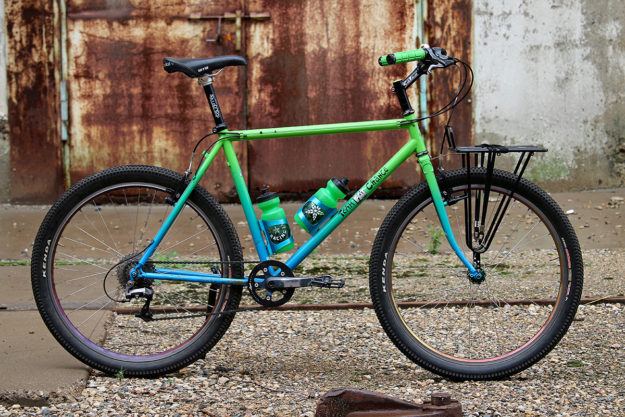
After all, on the other end of the line was Chris Chance himself, a mountain bike framebuilding pioneer. His Fat Chance Cycles were the quintessential New England mountain bike of the ’80s and ’90s, with legendary models like the Yo Eddy, Wicked Fat, Team Fat, and so on. Irreverent marketing and spectacular ride quality were the brand’s signature, and they had an extremely loyal following. To this day, frames from that era and complete bikes are sought after by collectors and fetch top dollar.
In 1991 and ’92, I was a stagehand living north of Boston. The theatre where I worked was closed for the winter, so I had picked up a carpentry job working on a remodel of a 1790s-vintage house just off Harvard Square, and my daily commute took me right past Fat City Cycle’s headquarters in Somerville. Despite seeing it every day, I never stopped to stick my head inside. At the time, my bike was a steel Diamondback Apex LE, which was a really nice frame, complete with bi-ovalized downtube, smoke paint, and a Hite-Rite. My meager theatre paycheck meant there was zero chance of me owning a Fat Chance, but that didn’t stop me from drooling over them in the monthly pages of Mountain Bike Fiction, uh, Action. Stopping in to meet Chris at that time would have been more expensive than I could handle, so I resisted temptation and drove on, twice a day.
Years passed, for both of us, and I eventually cut off my pony tail and stopped wearing so many black T-shirts. Fat City closed, but spawned many other well-renowned framebuilders, including Independant Fabrication, Merlin, Seven, King Cage, and many more. Chris’ impact on mountain bikes was profound, and his legacy of short chainstays, long toptubes, and telepathatic-riding bikes lives on in the core of frame designs to this day. Zap Espinoza and John Tomac rode his frames, along with countless others, and as the years passed, the lore and legend of how his bikes rode grew.
Less well-known were his drop bar bikes, which actually pre-dated the mountain bikes. He had started Chris Chance Cycles in 1977, and made custom road frames until 1982, when he switched to mountain bikes and re-branded as Fat City Cycles. In the early 90’s, he brought road bikes back into the lineup, but instead of building with lugs, he TIG-welded in the same manner as his mountain bikes. Up until that time, road frames were all lugged and brazed, and switching to TIG lightened the frame and sped up production. The Slim was born in 1991 as one of the first TIG-welded road frames, certainly in the US, while Stelbel was welding road frames in Italy at the same time. To think that as I drove by the factory twice daily, the genesis of a bike I would own 33 years later was occurring is yet another example of how I am slow on the uptake.
Here’s what Chris said about the bike:
“I don’t remember how many Slims we sold. I do remember we thought we’d have an easier time getting into the road market based on dealers’ enthusiasm for our mountain bikes and the good reviews on the Slim we got in the mags. But sales of the Slim were slower than we expected.
The Slim was a combo of using the depth of experience I gained from the bikes I built as Chris Chance Cycles and what I’d learned building TIG welded mountain bikes. Both aspects contributed much to the Slim Chance.
TIG Welding made the most sense for the Slim for all the good reasons. We’d been building the Fat Chance Team Chance for a bunch of years with Tange Prestige heat treated tubing with the same wall thicknesses we used on the Slim. On our mountain bikes we used 30 grams of welding rod to join all the tubes on a frame. It was even less on a Slim with its smaller diameter tubes. I never weighed how much lugs add to a frame but it’s significant.
There are great stories from the Mavic support team from ’89 I think it was. We built 10 Slim Chances for the race support they did with all the big races in the US that year. The pros from Europe came over for several of them. I heard a few times that pro riders would have a flat or mechanical issue and get on a Slim to continue on in the race. The tech crew would fix the issue with their bike and figuring they would be happier to get back on the bike that was set up just for them, they would offer to switch them back. But several times riders would decline, saying the Slim felt much better to them so they would finish the race with it.”
For more history and info on Chris and his work, check here and here.
The Other Frame
In 2016, I bought a used Ibis Spanky road frame off eBay on a whim. The frame tubes were tiny, as was common for the era, with a 28.6mm top tube and 31.8mm downtube. Like its Slim predecessor, this frame is TIG welded. The frame is a 57cm, classic horizontal toptube design, and is technically 1cm too long for me based on the customary 100mm stem. Using my impressive math skills, I deduced that a 90mm stem would fix that problem and the frame would thus fit like my 56cm frame and its 100mm stem. Which, oddly enough, turned out to be the case. A slightly long top tube with a shorter stem also resulted in quick, but not twitchy, steering, which I am very fond of. It also helped with my own geometry, which includes short legs and long arms, and longer bikes have always felt more comfortable to me.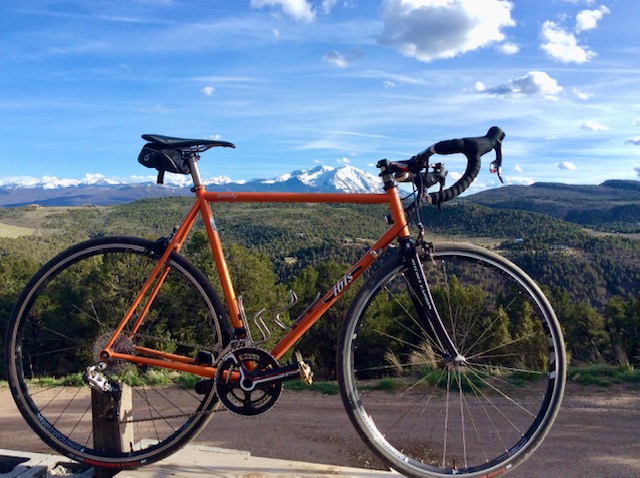
Being a 1998 frame, the head tube was for a 1″ steerer, and the seatstays were seemingly pencil-thin at 14mm. By the mid-twenty-teens, carbon road frames had evolved ginormous downtubes and massive bottom brackets in the search for stiffness, but these huge monsters robbed many frames of ride quality. Just looking at them and imagining a CDOT-spec chip-and-seal road could cause fillings to pop out of your mouth. The Spanky by contrast, was diminutive, with seemingly gossamer threads making up its frame.
Sadly, its paint was in bad shape, so I had it powdercoated to match the 1998 catalog’s color of Eddy Orange, which had a pleasing Merckx-Molteni shade. The powdercoater included a candy coat, with glitter in a clear layer, making the frame sparkle beautifully in the sunlight. A set of reproduction decals and a neo-retro build (1st generation SRAM eTap wireless, FSA cranks, stem, bars, and American Classic Sprint 350 tubeless wheels shod with IRC tires) completeted the picture. Despite not seeking a weight-weenie build, it came out at just over 17lbs with pedals and cages.
Sublime barely describes the ride quality of that bike. It seems to float down the road, frictionless and smooth. The tubeless tires are narrow, barely 26mm since the frame was designed in the era of 19-21mm rubber. Decending, it feels as if it’s on rails, and on my go-to loop, setting the bike free finds me coasting downhill at 40-45MPH, but it feels stable enough that I am comfortable grabbing a bottle. It has taken its place in my fleet as my most favorite bike. It would be perfect in all ways except for one small thing: it pre-dates road disc by a generation, and my MAMIL-mass takes a certain amount of force to slow down, let alone stop.
Those little tubes are flexy, particularly when my fat ass is perched atop them, but the bike feels lively and snappy, rebounding like a slalom ski under foot. By contrast, my Waltly titanium frame (which I designed in 2017 in an effort to re-create the Spanky’s handling but in a breakaway version for travel) feels like a solid GS ski, carving long, fast, dampened turns. The Waltly is a great bike, has been on many trips to explore new roads, and it fits in a compact case, but it’s no Spanky. The ride quality of the Waltly is ideal for travel, more damp and quiet, fast on descents, good on climbs, and able to run 700×50 tires, so it can do duty on nearly any surface. The Spanky, by contrast, prefers pavement, and its lively rebound does not mix well with washboarded dirt roads.
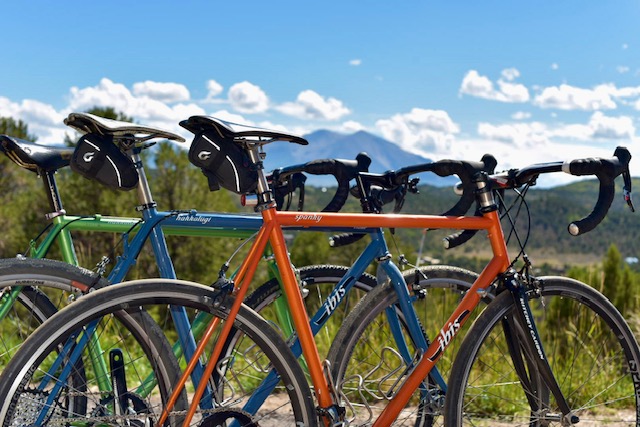
There’s a long history of the connections between Ibis and Fat City. I recommend pouring a deep cup of your favorite libation and reading the history section at Ibis, particularly Chapter 5. Having and loving this bike, I had always sort of toyed with the idea of having a Slim Chance to experience the East and West coast interpretations of road bikes, but the original Slims are scarce and expensive because they are so rare. The idea sat in the back of my skull and on my saved eBay searches, but never really progressed much further.
The New Frame
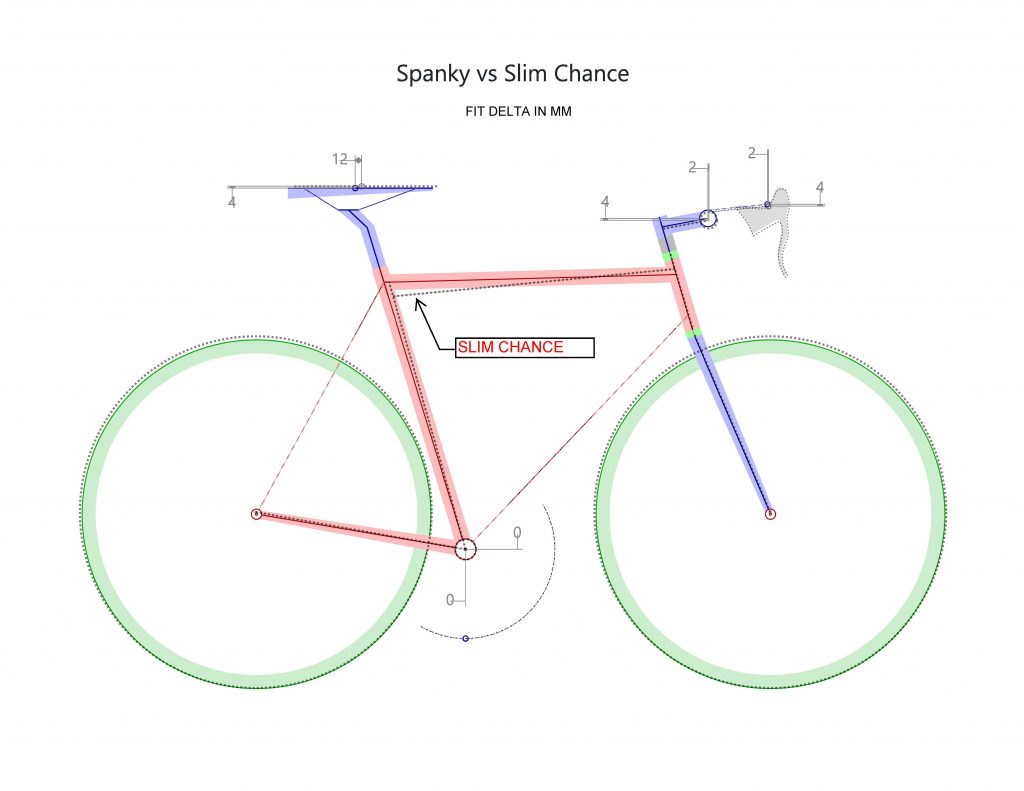
I sat at my desk one day, pretending to work, but thinking about bikes, as is my habit. Using a cool frame-geometry comparison site, I plugged in the Spanky’s geometry and overlayed different geometries on top of it to see the differences and try to divine the reason the Spanky is so good. I experimented with several sets of numbers, looked at some frames on line, and found myself at Fat Chance, the re-born company that Chris opened in 2015. I plugged the Slim Chance’s geometry into the BikeGeoCalc site, and it overlayed on the Spanky as a nearly identical match- with fit points such as bars, stem, saddle varying by 2mm or less. More critically, chainstays, wheelbase, and trail were spot-on identical. It was clear that the Slim Chance’s stock geometry matched my favorite bike to a T, and the Slim was designed for disc brakes.
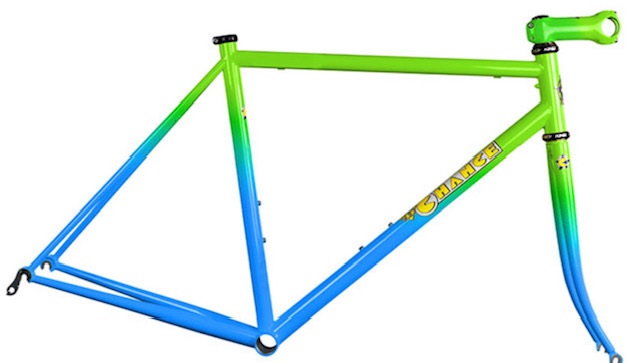
Crucially, the classic Fat Chance fade paint jobs were still on offer, and the green-to-blue Aqua Fade fairly leapt out of the screen and grabbed me. The price was right, too, particularly considering stock carbon road frames can often cost more than double what I saw on the page. I was smitten, and left a message on the number listed on the site.
The Design
Up for discussion with Chris was tube selection, which is critical for the feel and handling of a bike. Modern tapered fork steerers use 44mm diameter head tubes, which are significantly stiffer than the 34.9mm diameter head tube of the Spanky. The 1-1/4″ tapered steerer itself is much stiffer than the 1″ steerer on the Spanky, which flexes enough you can feel a difference simply moving spacers. Stiffer head and steerer tubes result in more positive steering as they resist twisting along the axes of the top and downtubes, but relies on the fork blades to be designed to still allow fore-aft flex to absorb road chatter. Similarly, combining different sizes of frame tubes will affect the lateral, vertical, and fore-aft flex of the main frame members, so balancing the characteristics of each tube in sync with the others is the black magic of a good steel frame.
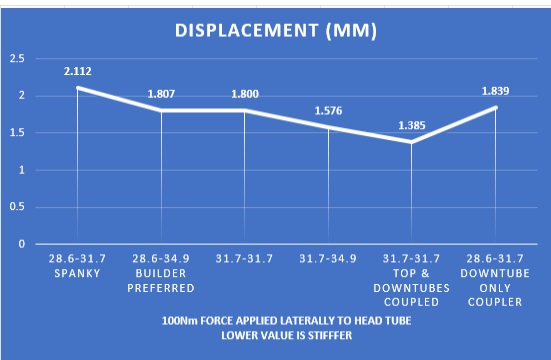
In essense, there are 3 sizes of commonly used front triangle steel tubes: 28.6, 31.8, and 34.9mm. The Spanky, as mentioned above, uses a 28.6 toptube and 31.8 downtube. For now, we’ll call that pairing “little-medium”. Chris (and many other steel builders) like to use 28.6 toptubes and 34.9 downtubes, which would be stiffer than the Spanky, but still much less stiff than a modern carbon frame. We can call that “little-big” for comparison. Since I’m kind of a pain in the ass, I wondered how “little-medium” and “little-big” compared to “medium-medium”, and how changing a tube’s length would impact flex and stiffness. I’m extemely fond of my breakaway bikes, and I love to travel, so I was toying with the idea of adding a Z-coupler setup to the bike. The couplers are only available in 31.8 (medium) and 34.9 (big) and are approximately 75mm long when built into the frame. Since this is effectively a solid billet of stainless steel, it doesn’t flex, and it also shortens the tube, reducing its flex as well.
I mulled this over in my head, wondering how a “little-medium” pairing feels different than “medium-medium”, “big-medium”, “medium-medium” with short tubes and solid ends, and so forth, through all possible permutations. Eventually, I decided I needed to leave my daily world of 2D CAD and downloaded a demo version of Autodesk’s Fusion 360. This would allow me to build a rudimentary front triangle, give it tube diameters and wall thicknesses, and model a force against it. By using the same model and making only simple changes, I could create a comparison of deflections with a given force.
Autodesk, as a rule, seems to dislike its customers. I’ve been one for well over 30 years, and I use AutoCAD daily. It works, I know it well, and as far as user experiences go, I prefer chewing tinfoil. If there’s a counter-intuitive way to do something, they’ll seek it out and embrace it. If there’s a way to make a simple operation clunky and hard to use, prone to failure and lacking explanation as to how to fix it, they move this to the top of their list. In short, I knew that teaching myself 3D CAD over a sweltering July weekend would be slightly less pleasant than shaving my ass with a cheesegrater, but I wanted to know the answers, so I dove in, armed with several cold beers and YouTube tutorials to see me through the process.
On the whole, it was exactly as I expected: frustrating, crashy, help-topics-on-forum-don’t-help, and all the fun I’ve come to expect from Autodesk, with included spammy emails telling me to buy it now before the price goes up. I did, however, manage to create some models, including some with solid bar stock to represent the couplers. I was not able to change the tube wall thicknesses to model butting, so they stayed the same wall thickness. I never really figured out how to use a force to twist the head tube relative to the seat tube, but with my rudimentary skills I managed to create several models with enough consistency that I could say different tube pairs deflected by X% when given the same force in the same direction. It’s possible I could have gotten better, more accurate models, but I was out of beer.
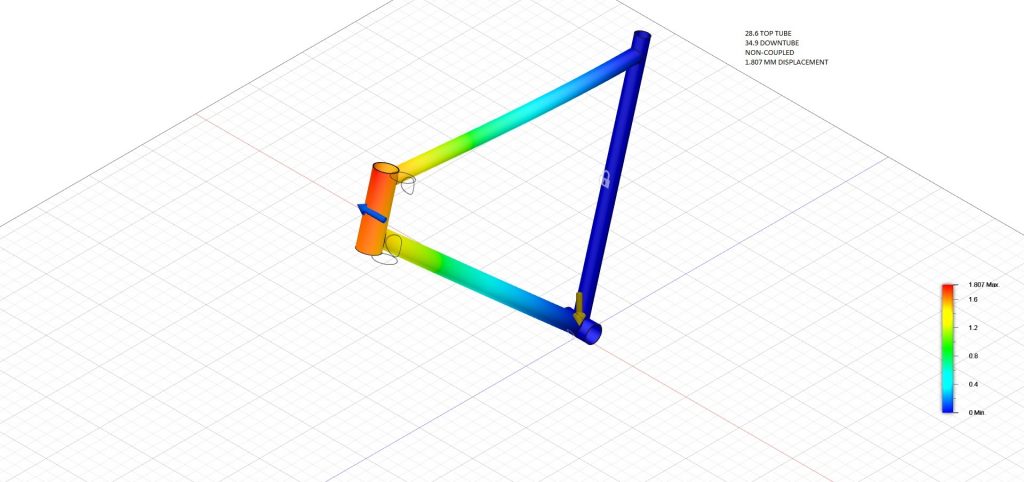
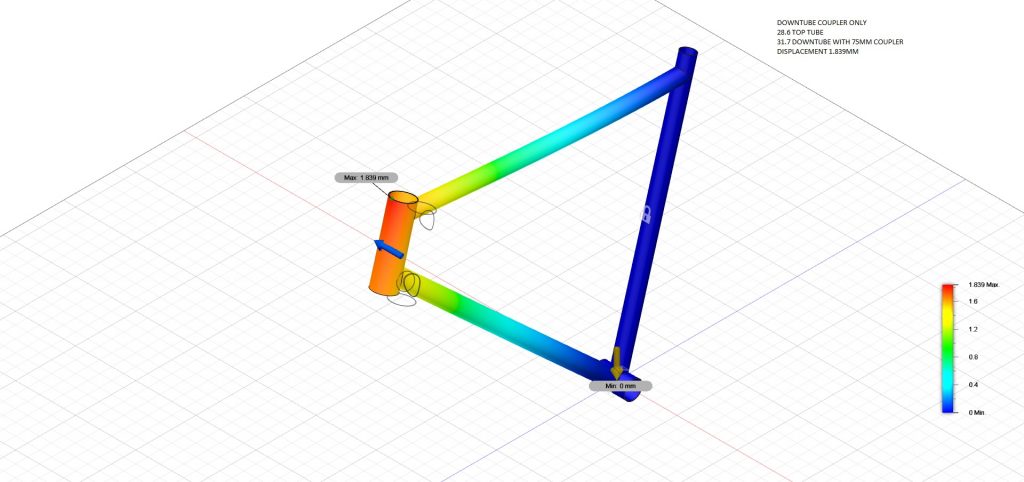
In essence, what it showed was that “little-medium” deflection with a Z-coupler varied by about 1.7% when compared to “little-big”. Thus, a coupled bike, with a single coupler on a “little-medium” 31.8 downtube and a ‘sliced’ seat tube held together by the seatpost, was damn close to the same frame with a “little-big” 34.9 downtube and no coupler. Chris reviewed these results, and exhibiting remarkable patience at my insanity, agreed this would work. Later, during a chat with Josh Poertner of Silca, he listened to my explanation and modeling description, and he agreed that my method was close-enough to be reasonably accurate. Getting confirmation from a guru like Poertner was no faint praise, but in reality, I’m pretty sure he was trying to get rid of me.
As noted above, I can be a pain in the ass, and have a reputation to uphold. I put significant effort into this, and as such, decided the frame also needs a SRAM Universal Derailleur Hanger (UDH). This is an open-license design created by SRAM, and it is intended to provide a frame and hanger design that allows for easy hanger replacement, because it’s not frame-specific. Originally developed for mountain bikes, the hanger is also designed to rotate backwards in case of a hit. It is migrating into gravel bikes, and in the summer of 2023 also started to appear on select road bikes, inlcuding one model ridden in the Tour de France. By early 2024, the list of skinny-tired bikes with UDHs had grown even more.
The big picture with this hanger is more than just the ease of finding a replacement: SRAM’s new Transmission mountain bike derailleurs mount with the hanger removed, and brace from 2 sides directly to the frame. This is much stiffer than a traditional hanger mount, and with the tight tolerances of 12-speed drivetrains, it makes derailleur alignment much less prone to flex and mis-shifts. Originally designed with e-bikes in mind, muscle-powered bikes also benefit from the system’s added stiffness and durability.
At this time, there is no Transmission-style road derailleur, but the writing is on the wall. UDH offers more future flexibility for mounting, and it’s clear that SRAM is heavily invested in using this mount in the future. Even though the grouppo I have on hand is standard, using this hanger allows more flexibility in the future if SRAM expands Transmission to the paved world. Since it’s so new, not many hanger/dropout combinations are available yet, but Paragon Machine Works and other frame parts companies are quickly ramping up. Chris rightly wanted to use a stainless dropout because the paint will inevitably chip there.
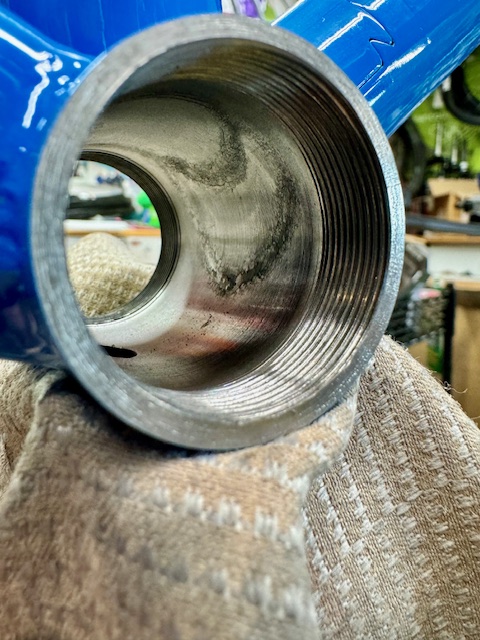
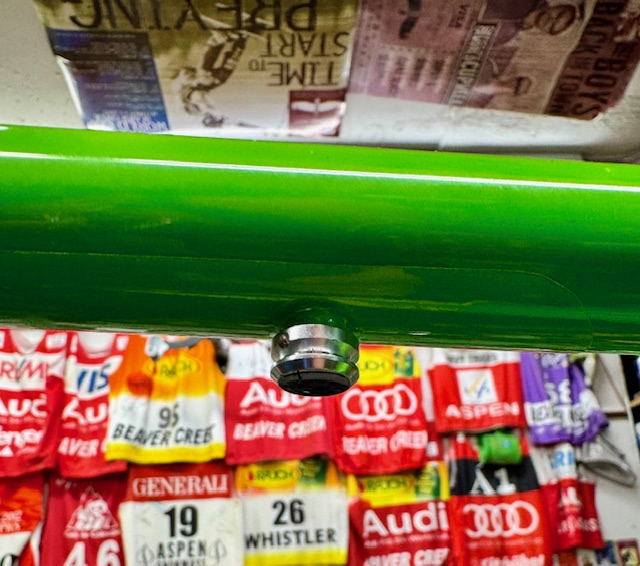
Other than the tube combination and coupler, the modifications I requested were minimal: bosses under the tobtube for a possible bolt-on toptube bag, something I have found to be invaluable on other bikes, especialy for epic days and travel. I also asked him to put a boss on the seat stay bridge as a location to mount a tail light. The geometry was such a perfect match that there was no reason to change anything. Chris suggested using a particular seat tube he had on hand, a stainless tube that had longer butting and would be very strong for the coupled seat tube. I quickly agreed to this.
Fabrication
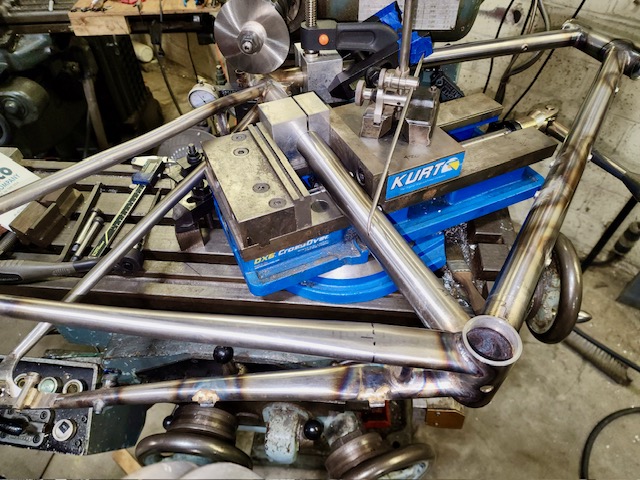
With a stainless seat tube and Paragon head tube and bottom bracket, the rest of the frame is Columbus Life tubing. Dropouts are from Paragon, and no fender or rack bosses are included. If I decide to use my trusty Tailfin aeropack, it does not require bolts, just a special axle, so there was no real need for extra threaded points. I requested that Chris take photos during the construction of the frame, and he very kindly obliged.

Finally, in late February, nearly 8 months after the first phone conversation, the frame shipped. The long lead time was more my fault than Chris’, with my dithering on tube sizes and hangers. His original goal was to have it for the MADE show in late August, 2023 in Portland, but too many things conspired against that deadline. Plus, I told him there was no reason to rush, winter was approaching and having a new road bike too early would result in massive snowpacks and excessive time on the plow.
Once safely packed and handed off to United Parcel Storage, the Slim started a slow journey to my house. Since the weather had been clear and dry for almost 2 weeks, it was inevitable that the tracking number also had a storm attached to it. UPS’s website showed tracking by truck from Oregon to Salt Lake, when the site changed its updates to simply saying that adverse weather had delayed delivery by a day. Then, a few hours later, it stopped tracking entirely with these alerts:
Service Alert Due to Situation in Ukraine
UPS has suspended substantially all operations in Ukraine, Belarus, and Russia.
and
Severe weather in Louisville, Kentucky has caused a disruption in operations at Worldport, UPS’s main hub in the United States. As a result, scheduled delivery times for a limited number of Air and international packages may be affected.
Thus we can surmise that the UPS depot in Denver was a complete shitshow and nothing had been scanned properly for at least 48 hours. In other words, Situation Normal.
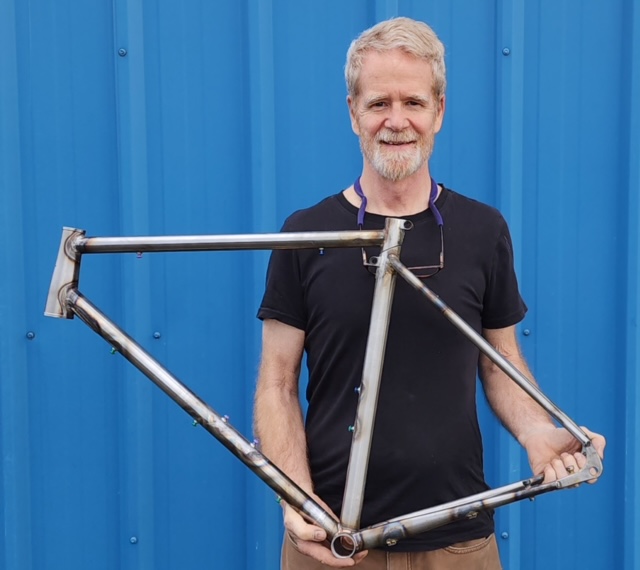
The Frame
It arrived while I was at work, and Mrs. MAMIL placed the box in the basement. I knew I would be home late, so I offered to wake her up so she could enjoy the unboxing. Oddly, she declined. I poured a Belgian beer and cut the tape on the box. What emerged was a thing of beauty.
The Z-coupler measures 41mm, not the 75mm I modeled. Therefore, I suspect the 1.7% stiffer flex predicted by the model is now most likely 0.0% or thereabouts.
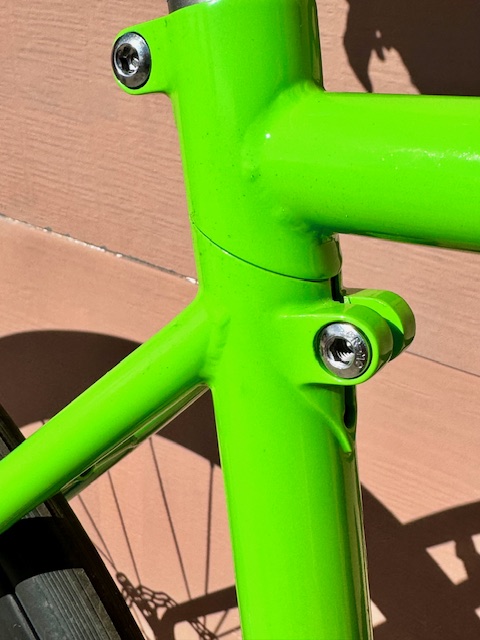
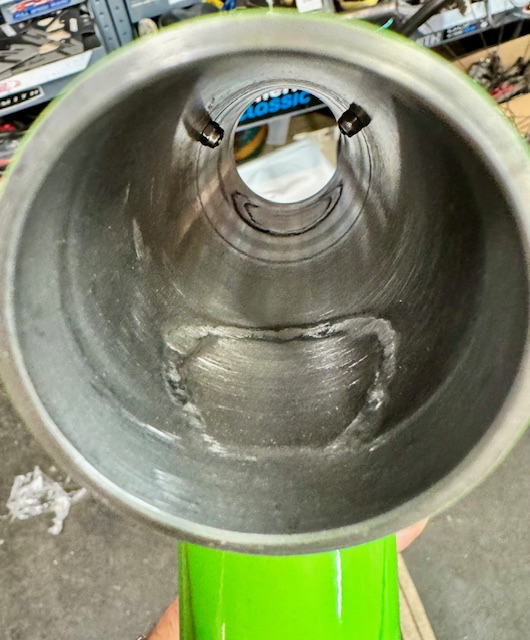
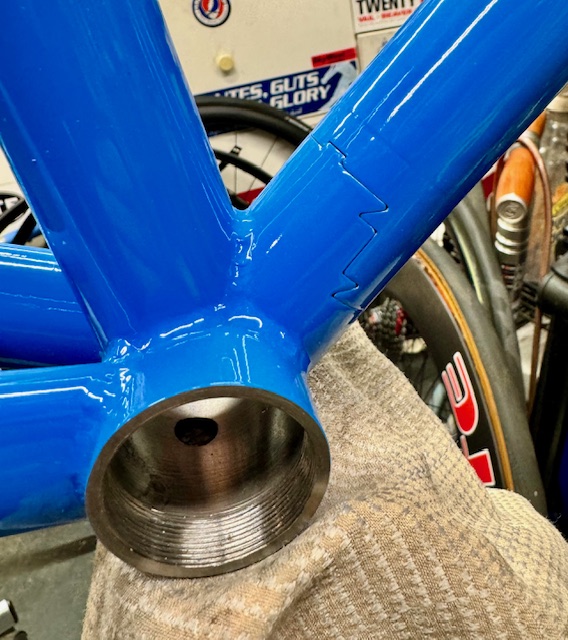
One thing that sets Chance apart is that he fills the breather holes in the tubes. Look inside any metal frame, and you’ll see openings into the adjacent tubes. The holes are there to relieve pressure from the heated gasses inside, they can be powerful enough to blow through a bead. Chris fills these, sealing the tubes. He also uses “blind” bottle bosses, again to block water ingress into the frame. No doubt the genesis of this was building steel bikes for use in New English weather. I spent a few years in the region, and it can be soggy, even on a sunny day.
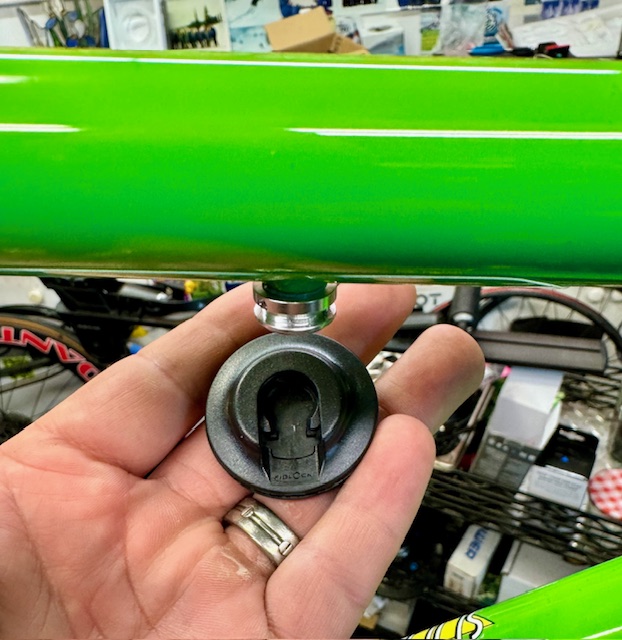
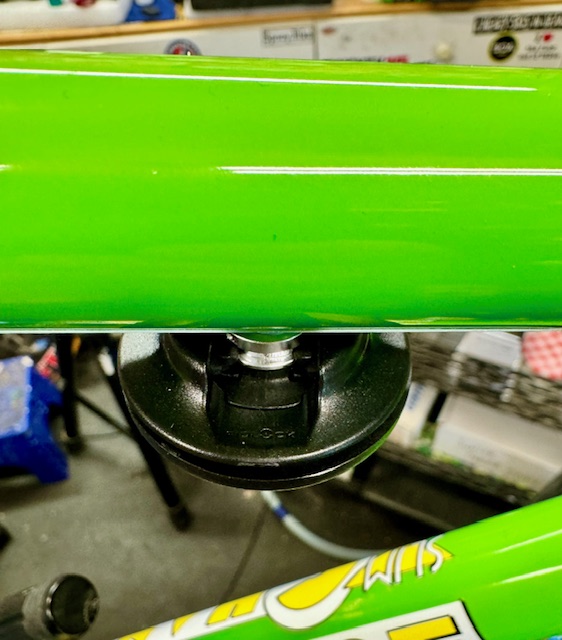
I did request 2 bosses be installed under the top tube for a future framebag. The plan is to work with a local bagmaker and use Fidlock hardware. When I first saw their magnetic bottle mount, it looked like a solution in search of a problem, but in fact, their products can be used for many more applications. Canyon is using Fidlocks on their new Grail frame bag, and again, as a professional thief, I was happy to steal that idea. The studs insert into 5mm frame bosses, then the receptacles go into the top of the toptube bag. The receptacles are designed so that they snap straight onto the stud, but must move laterally to be removed. So, with them oriented in different directions, the bag will attach straight up under the tube, then rotate to be removed.
Paragon’s UDH dropouts are very sleek, and having this universal hanger will provide much future-proofiness, plus easy to find replacements.

The paint fade is gentle, not abrupt like on many bikes (Ritchey, Serotta, Klein, etc.). It takes its time to make the fade, resulting in a blend of colors rather than a hard stippled stop. It looks more like the work done by Joe Bell and Black Magic Paint. It’s not easy to make a long-transition fade.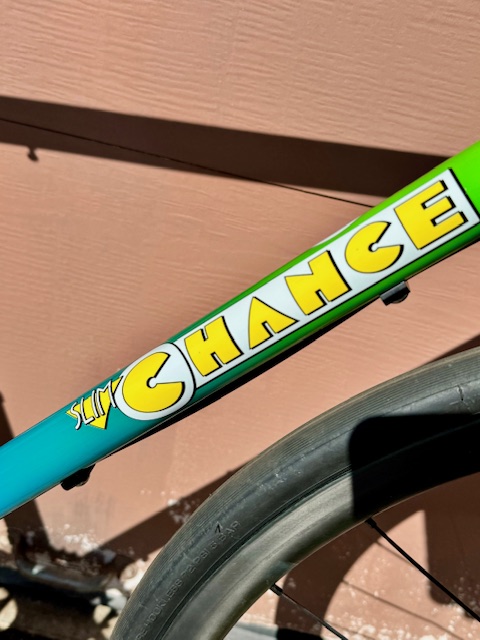
Hanging Some Parts
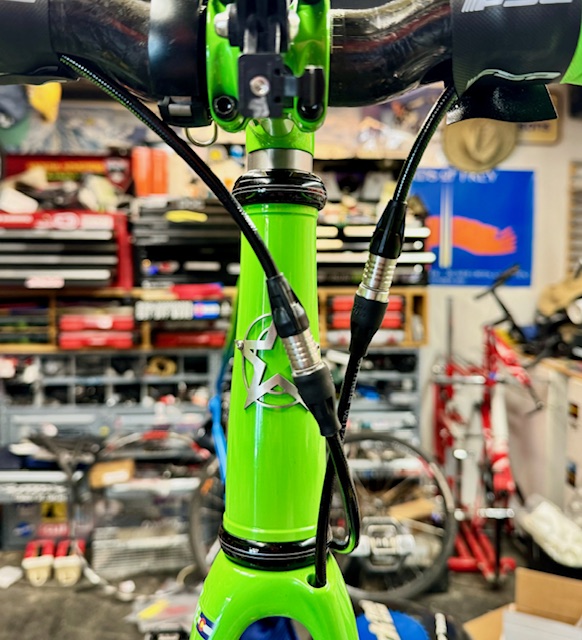
I moved many parts and goodies over from my Enigma (a wonderful bike, beautiful ride quality, but just not quite what I was seeking. It is now being ridden by a good friend who loves it), such as my FSA bars, trusty Selle Italia SLR saddle, titanium layback seatpost, FSA crankset, and my pedals. The FSA PowerTouch tape (my personal favorite) was a lucky perfect match. I upgraded from e-Tap 11 speed to Force AXS, and used Formula coupled brake lines for ease of travel. Hope RX-4+ brakes complete the package. All of these parts spent a few months hibernating in cardboard, waiting patiently. On a particularly snowy Saturday, I awoke them from their slumber and introduced them to the frame.
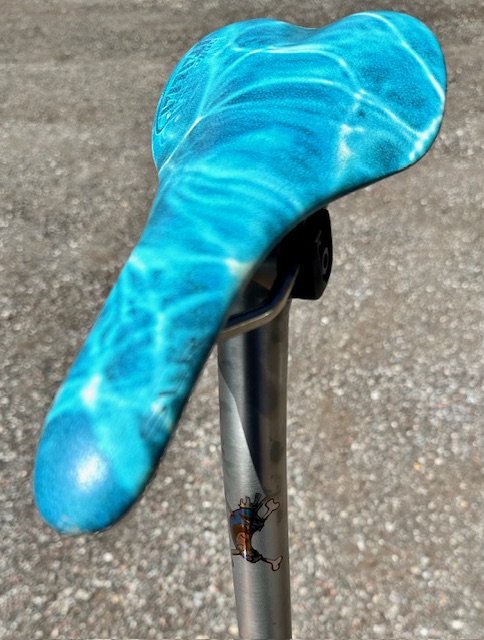
 Eddy is an iconic part of the Fat Chance history, and although he doesn’t appear on Slim Chances (which have a very different graphic design than the mountain bikes), I thought he should appear in his screaming-ness on the bike, so I busted out the anodizer and put him on the seatpost. I asked (as have many people) who Eddy was, and Chris said that after he was born as a doodle on the shop floor, someone shouted out “Yo, Eddy!” aross the table in a meeting, and it just stuck, becoming a character, logo, and bike. I had wondered if Eddy was the Eddy, but since the Fat Chance crew at the time were pretty much all mountain bikers, a mutton-chopped Belgian probably wasn’t in the forefront of their minds. Perhaps a Dutch Eddy was the inspiration, one who was heard heavily on FM radio in the ’80s and ’90s might have been the inspiration, subliminal or otherwise, but we will most likely never really know. The saddle is a 2004 limited-edition water pattern SLR and I thought it was a perfect companion to the aqua fade paint scheme.
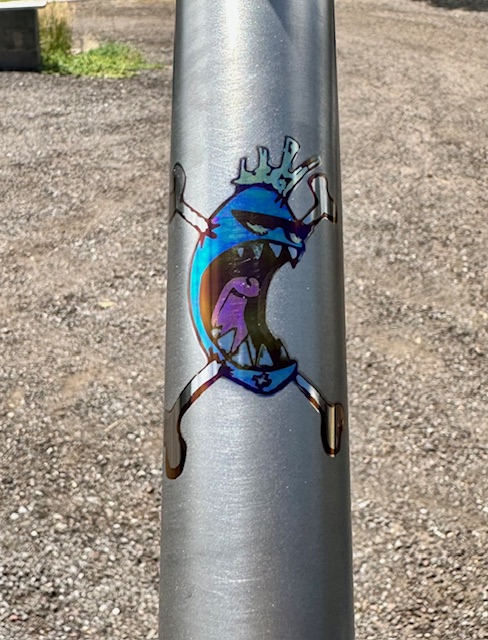
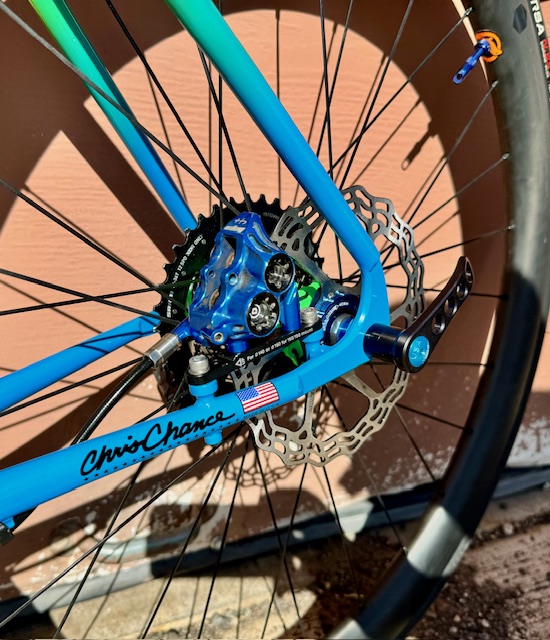
The ’90s may have been Peak Ano in the mountain bike world, while the 2000s swung back to basic black. I’m a pretty big fan of colored bits and bobs, so things like anodized blue brakes, blue disc lockrings, and even (gasp) colored bar tape make an appearance. I sent 2 stems to Chris to include in the painting for even more matchy-matchy. You can’t do colored bits half-assed- you must go all in.
Although this bike isn’t intended for gravel, many of the roads in my area are unpaved. The roadbase surfaces, when freshly sealed with magnesium chloride for dust control, are often smoother than actual pavement, so the bike will definitely be used on them. I’m hoping to put many miles on our palette of road surfaces, as well as travel with the bike, so quoting Alphonse Steines seemed appropriate. It’s not the first bike to bear these words, since they are inspirational and aspirational as well as rooted in cycling history. Amateurs copy; professionals steal.

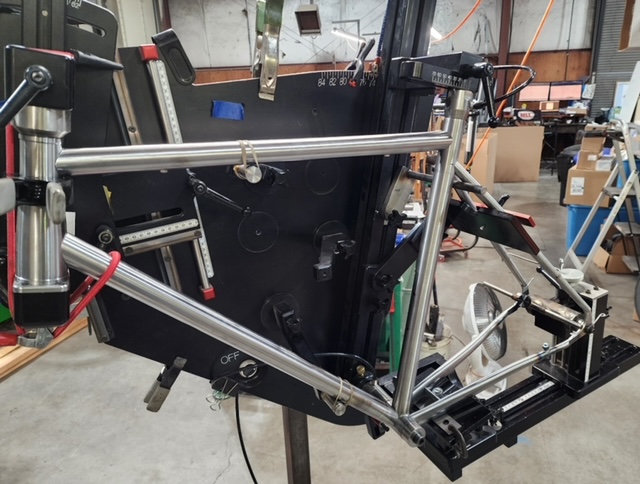
Given that this bike is intended to be a match to the Spanky, it was time to put both into the fit jig. I have an older-model BiciSupport jig which allows you to move medieval-like arms and pointers to the major fit points on a bike for easy replication. Simply put, place the original bike in the jig, slide the pointers to each location you want to mark, then remove the bike and put the new one in the jig. In reality, it’s like wrestling an octopus, particularly with one bike having quick-releases and one having thru-axles. Despite that, I won the match and the octopus was vanquished.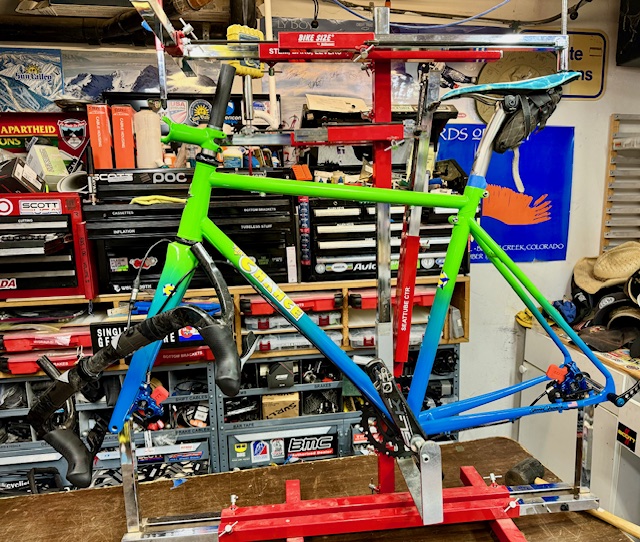
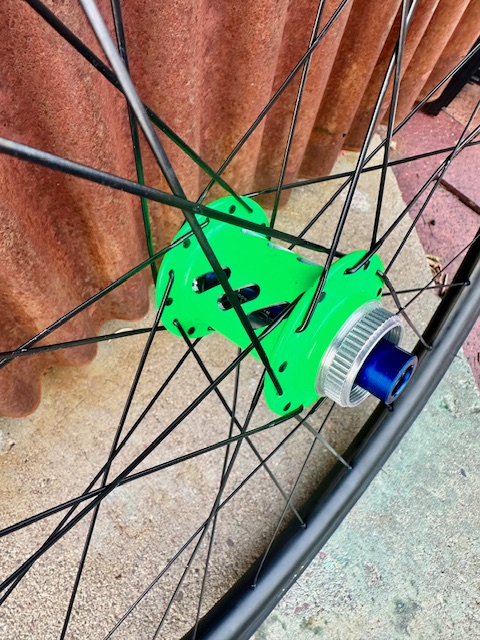
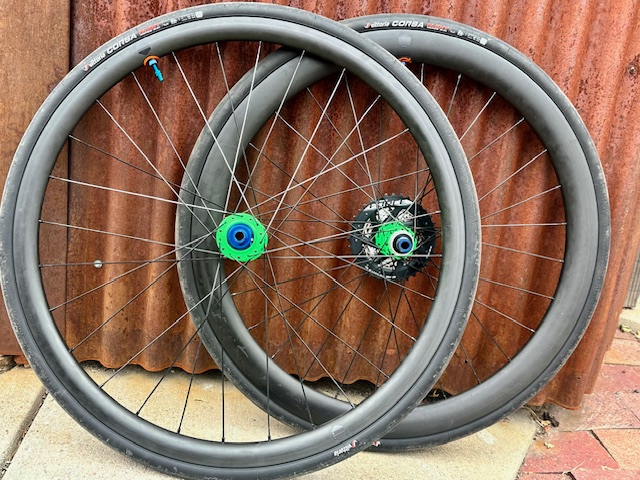
A new wheelset was needed, so I ordered up some Nextie rims and Onyx hubs. Onyx are not a weight-weenie hub, with the rear weighing well over 100g more than most rear road hubs, but the instant engagement and silent coasting are oh-so-nice. They also come in many powder-coated color options and you can also select colored endcaps, so I matched the green in the aqua-fade paint and went for blue ano endcaps. Sapim bladed spokes and DT Pro-lock brass nipples made for a nice build, and coming it at just over 1600g, the pair was reasonable for weight but off the charts for appeal. Onyx has a sweet cut-out front shell that gives glimses of the anodized axle sleeve, and while common on BMX and mountain bikes, it rarely shows up on the road. Given the history of Chance, I thought a bit of mountain bling was appropriate. Onyx hubs are my favorite to build with, and I’ve built about 20 or 30 pairs for the local bike shop. They lace up easily and the quality is exceptional. The weight is a small price to pay for such great hubs.
More snow-induced delays meant the front derailleur clamp was being held captive by USPS, so the build progressed until all the parts boxes were empty. Brakes bled, headset preload completed, seatpost marked, the bike went to its parking place to wait for the mailman to arrive.
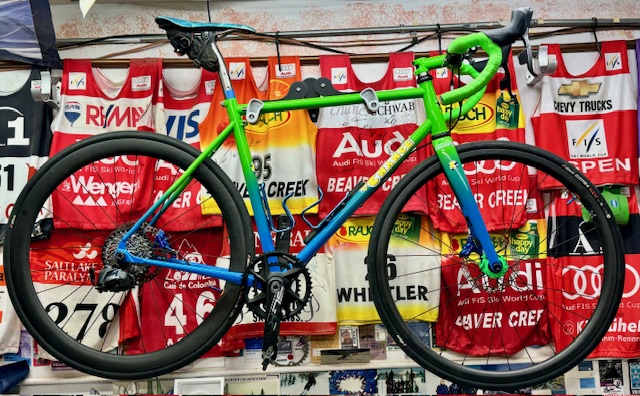
So here’s the thing. It’s more than a bike: it’s a process, a path, a journey of discovery. Throughout the design and build, there were challenges, hurdles, and details to be sorted out (because I’m a pain), but in the end, the result is a beautiful machine built by one of the Masters. It’s like ordering a guitar and Les Paul builds it, or ordering a glass vase from Harvey Littleton. I’ve walked through homes with impressive art collections and lit many of them. I’ve listened to loud music played on incredible guitars. I’ve visited museums thoughout the US and Europe and marveled at the wonders they contain, but now I have the work of one of the legends of American framebuilding hanging in my basement, calling me out to throw a leg over it and enjoy the ride. Few works of art could be more satisfying, one that looks stunning on the wall and can also be used as its design intended.
However, that aforementioned ride will have to wait. Being our snowiest time of the year, instead of a blissful cruise on this gem of a bike, I will ride the snowplow. All good things come in good time, so when conditions allow, I’ll ride it and post about it here.
2 Replies to “A Slim Chance at Success”
Comments are closed.