
For those who managed to digest all 4,000 words of the story of how the Slim Chance made it to my house, you certainly deserve to hear how it rides. The TL;DR answer: fantastic.
You could call it good right there, say to yourself, “Chris makes a damn fine bike“, and move on. However, if you did that, you’d certainly be missing out, and if you’ve found this site, you are well aware that I do not believe in brevity. So go get a cocktail (several, really), a coffee, or a sandwich so you can prepare yourself for a review of what is, in fact, one damn fine bike.

First off, let’s recap. The purchase of the Slim was to replicate and recreate the Spanky, bringing the feel of steel to the disc brake era and allowing for larger tires. In this: great success. But that begs the question- did the indescribable feel of a late ’90s steel frameset translate to newer (and larger) tubes, bigger tires, and the ability to stop when so desired? Did the addition of a Z-Coupler make travel easier?
To answer, we need to dive into the feel of the bikes, how they transmit road sensations, how they climb, turn, carve, and most importantly, bring a ridiculous grin.
The Spanky erases much of the road buzz, and this is partly due to relatively soft and flexy tubes (particularly the front triangle), 26mm tires set up tubeless and at 65PSI on shallow alloy rims, giving it overall feeling of frictionlessness. On flat roads, applying power quickly to the pedals introduces a lot of flex to the bottom half of the bike, and it feels like it’s “skating” left and right. It’s a subtle feeling, but it’s clearly there- the aft end of the bike flexes laterally due to the small diameter seat tube, down tube, and quick-release hub. Certainly the 1″ steerer tube contributes to this feel, as the head tube and seat tube can flex laterally with regard to rach other. This is not an unpleasant feeling, rather it makes the bike feel lively and springy.
When climbing, the flex becomes more apparant, particularly when out of the saddle. In fact, the bike nearly begs you to stay seated and spin at a high cadence. Standing can make the bike feel whippy, but when seated, it feels steady and smooth. It feels fine on smooth dirt, but washboards can turn it into a flexy mess.
In essence, its success and failure is in the diminutive tube sizes. The 28.6mm seat and top tubes, plus the 31.7 down tube, are very small. In particular, the Spanky’s 34.9mm head tube with 1″ steerer inside, pale in comparison to the Slim’s 31.7 top and down tube, plus tapered head tube and tapered steerer. The chainstays and seat stays of both bikes are effectively the same sizes, with the only difference being different vintages of Columbus tubesets. In addition, 12mm through axles provide more stiffness than 5mm quick release skewers.
The Spanky floats a bit, flexes a lot, and delivers a smooth, predictable, quick, and silky ride. It’s happy on steep climbs, it’s fun on twisty descents, and it loves a long ride. The bike sets an extremely high bar in ride quality, one that the Enigma almost met, but ultimately fell short in what I wanted. In the case of the Enigma, which was made by one of the UK’s finest manufacturers, I think the Zona tubeset was the factor.
As noted previously, I selected the Slim because its stock geometry was nearly identical to the Spanky. Only the chainstay length (2mm) and the slope of the top tube were different, the stack and reach (560/399 vs 571/396) were nearly the same. The difference in stack is due a shorter head tube on the Spanky, quill stem, and locknut, but the bar center is effiectively identical. Similarly, the head and seat tube anges were the same, and the trail only varied by 1mm. If I was going to get an update of the Spanky, these numbers were it. On paper, the contact points fell within 1-2mm of each other, so the Slim was as close as one could realistically expect.
This brings up the topic of custom versus standard in bikes. The inestimable James Huang had an excellent post on Escape Collective regarding this, and I think it begs consideration. As a side note, despite James recently leaving Escape Collective, it is a worthy site and you should become a member.
Fit is clearly the most important consideration when (or if) deciding to go custom, and in some instances, specific geometry is critical to the success of a new bike. In this case, however, the stock geometry was absolutely what I wanted, down to the millimeter, so the custom aspect was in the details and minor things, not the big stuff. If, dear reader, you consider a custom frame (and you absolutely should), research the bejeezus out of other bikes, test bikes, get a good fit, and pay extremely close attention to details. Choices like fender or rack mounts, couplers, dynamo routing, and so forth can make or break a new bike- even if it’s exactly what you ordered, if you’re OCD about your machines, a tiny thing can bug you, so be patient and do your homework. A framebuilder with the experience that Chris has can help make sure that you get the bike of your dreams.
Even with the stock geometry, there was some customization: the Z-couplers, bosses under the top tube for a bag, and a modified brake bridge for a light mount. These are minor in the spectrum of possible customization, but since the geometry stayed as Chris had designed, I’d actually consider this semi-custom at most. Even the eye-popping paint job was standard.
The Slim got a few rides after the initial build, but this spring in Colorado has been just an extension of winter, with snow falling in late May. Despite a deep desire to take the bike out to ride, many of our days were much more amenable to the fat bike. I managed to log a small handful of rides, but it got its first taste of longer rides in Silver City, New Mexico, during the Tour of the Gila.
The Slim got disassembled and packed for travel. I’ve been exceptionally pleased with the S&S couplers on my other bikes, but the Z-coupler is a whole new level. The diminutive size and unbelievably simple and clever design not withstanding, it just works. It’s fast, easy, intutive, and zips together with a single bolt. It’s genius. It’s also fantastically expensive, but like the good things, you get what you pay for. In reality, the cost of an S&S coupler vs a Z-coupler is pretty much a wash, and the function of both is identical, but in a new build, the Z is a much better choice.

Packing the bike was easy, the Z-coupler and its single bolt plus the Ritchey-style split seat tube make the process slightly easier than an S&S system. I find that after assembling the S&S bike, on the first ride I have to re-tighten the coupler, usually a 1/4 turn or less. The Z-coupler stays tight after assembly.

The front triangle fits nicely into the travel case, and the truly time-consuming aspect of the packing process is the wrapping of the frame in protect. I also have wheel covers, to protect the rims from getting scratched. As has been said many, many times: practice, practice, practice before you travel.

A new tool I added to the travel kit ths the Altangle Hanger Connect. This tool works incredibly well, and breaks down into a compact size. They sell a specific case for it, but I found that a $9 Amazon 9″x7″x3″ case holds the clamp and my electronics kit.

The clamp can attach to railings, posts, or even countertops. It weighs about 3lbs, and taking the center post out breaks it down quite small. The standard center “spine” has 2 sets of holes drilled in one end, allowing you to set the clamps parallel or at 90 degrees. They offer a rotatable/extendable spine, it was backordered so I will have to wait to test it. This system works extremely well, and can do double duty as a home workstand or for various construction projects. In fact, their Instagram shows more images of it on jobsites than with bikes.

Long-term readers of this site know that I was most certainly not racing Gila, because they already had a broom wagon and did not need my services as sweeper. While my son raced, I took advantage of the time and empty roads to put the Slim though some more testing. I got to do some longer rides, on rougher pavement than at home, and found some good solitude among the pines above Pinos Altos.

During the downtown crit, I discovered that the bike had a separate and unique power all its own: it could extract bike nerds from a crowd, drawing them like moths to a flame. Mrs. MAMIL and I walked our bikes around, watching the race, and as we passed behind the neutral service pit, all 4 mechanics abandoned their posts to come over and ask about the bike. They were all in awe of the paint, they understood the Fat Chance history, and they all grinned when they learned that Chris is still building bikes. One mechanic noticed the MTB-style front Onyx hub and asked how I was able to get a road version (I asked Onyx, they said yes). All nodded in admiration at the silence of the Onyx freehub. It was not the first time true bike dorks had gone slack-jawed seeing Slim, and it’s far from the last.
Like the Spanky, the Slim is smooth, but when pedaled, jumps forward. It likes out of saddle climbing, but staying in the saddle and spinning up grades it climbs very well. There is little to no lateral flex, and the rear axle never feels like it’s out of plane with the bottom bracket. The head tube and tapered steerer also do a better job of staying in plane with the seat tube, resisting twisting and deflection when pressed into a corner. This is not to say the ride is stiff like a carbon bike; rather it flexes more as system than as individual tubes.
The result is a quiet, steady, smooth, and powerful ride. The bike powers down flat roads very well, and truly shines when the road tips up. In fact, it’s probably the best climbing bike I’ve ever had. In many ways it reminds me of my fIrst carbon road frame, a 2008 Orbea Orca. Unlike that bike, though, the Slim is damper and doesn’t transmit every road pebble through the handlebars.
One noticable difference between the bikes is that the Spanky seems to turn more quickly. I’ve double-checked the trail, fork offset, and head tube angle numbers over and over, and both bikegeocalc.and yojiming show them at 54 and 55mm. The Slim tracks a bit longer in a turn, but feels like it carves better. In ski parlance, the Spanky turns like a slalom ski, and the Slim turns like a quick GS ski (perhaps a skier cross ski?).
I drew a simple trail calc for the Spanky in CAD, with a 622mm rim, 26mm tire, 368mm axle-to-crown fork with 43mm offset, and the trail measures to 54.9mm. I then drew the Slim with a 28mm tire and 370mm a-c and 43mm offset, which resulted in a 55.5mm trail. These numbers are in line with the web calcs.
Realistically, it’s debatable as to whether I should be able to feel that, but on roads I ride often I can definitely feel the bikes steer slightly differently. Another factor could be the deeper rims (carbon 30mm front vs shallow alloy) having more mass as well as react differently to airflow, but again, this may not really be what I feel. Most likely, it is just because they are different bikes. Basically, the Spanky has a tendency to dive into a turn, while the Slim takes a rounder, more arc-shaped line. This means setting up for the turn slightly differently, and planning the apex a bit farther out than on the Spanky. If I was to describe it in skiing turns, I’d call it delaying the Slim’s initiation versus the Spanky wanting an early turn. As the miles tick by and I become more familiar with the bike, the steering is becomeing more second nature. I’m also becoming much more accostomed to the wind effects on both wheels, and am glad I chose a shallower front rim because it’s generally pretty quiet in crosswinds.
I’m a huge fan of the Hope RX4+ road disk brakes. The 4-piston calipers give excellent modulation, and have plenty of grip for my substatial mass. Plus, they come in a wide range of colors. Easy to install and set up, they also share pads with their mountain versions, meaning that it’s not difficult to find replacements.

As has been said many times, and will certainly be said again, Onyx hubs are my favorites. I find them easy to lace, easy to change configurations (swapping freehub bodies is a lark), and the quality is unsurpassed. Yes, they’re kind of heavy for a lightweight road wheelset. Get over it. The silent freehub and instant engagement is worth the extra grams.
The Onyx hubs are laced to Sapim CX-Ray bladed spokes and Nextie rims, 30mm front and 45mm rear. I don’t like the feel of my front wheel being pushed in the wind, so a shallower front rim helps mitigate that. Nextie’s rims are reasonably priced, quick shipping, and have lots of options. They also lace up easily. There’s no downside to them, and I’ve laced about 30 pairs for the local bikeshop. Each has been an easy build and has been rock solid, from enduro and XC to road.
I’m still trying to find the right tire pressure, the online calculators all say that with tubeless 28s I need 70PSI front and 72 rear, but that’s higher than I run the Spanky. The bike feels fast, but I get a bit more road buzz. I’ve let the pressure drop a bit, but I need to make careful notes and truly dial in the sweet spot. I’ve found that 65 rear/ 60 front feels better and my Vittoria Corsa NXT tires feel great on both pacement and mag-chlorided road base.
I wanted a good location for my DRL tailight, which I won’t ride without, anymore than I would saddle up without a helmet. On other bikes, the brake bridge (vestigal, as the brake is no longer there) has fender mounts, but these are under the bridge and plumb (straight down) and not conducive to mounting a light. I asked Chris to put a boss in the bridge that is oriented horizontally, rather than in plane with the seat stays as a caliper bridge would be. He obliged, and used an actual brake bridge, rather than a straight tube with a boss. I had envisioned using a GoPro mount pointed aft for the light, but he put the bridge in at the correct spacing for a caliper, which puts the light in a position where it rubbed on the tire. By flipping the mount forward and adding a short extender, I made a little armature that used the boss and placed the light above it, sort of nestled into the stays. Although it wasn’t exactly what I had in mind, it works just fine and I have no complaints.


Another custom add was bolts under the top tube. Like a couple of my other bikes, the ability to bolt on a top tube bag and eliminate straps is a huge plus. Rocky Mountain Rider, a local friend, made the bag to fit. He did an amazing job, fitting in both patches on the front end, plus providing tool pockets on one side and a “pump hammock” on the other side. He also made the wheel covers for the travel case, which are large enough to cover 29×2.5″ tires.
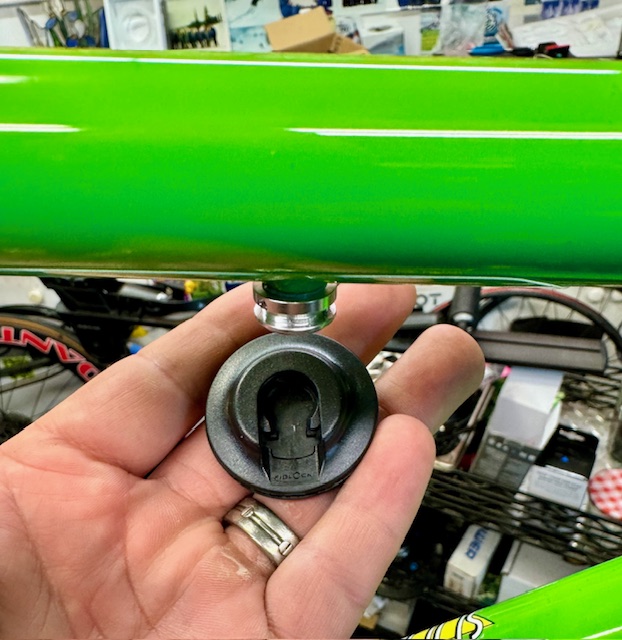


The Fidlocks pushed the bag a bit lower than I expected, but since it was built they have released a regressed receiver which will allow the bag to be closer to the top tube. Because they latch by pressing the bag straight upwards, the bag is easy to install. To remove it, I swing the aft end towards the right side, then pull backwards, which releases the front. Over about 400 miles, I had no issues with the bag swinging, coming loose, or making its presence known in any way. For long rides and tours, it’s invaluable and holds plenty of stuff. Initially I was concerned about its width, but I never once brushed my knees against it, and it is easy to open while riding to root around for a snack.

In the end, the bike rides wonderfully. It’s what I wanted, and as I dial it in, I get happier with it. Although the Spanky will need to be pried from my cold, dead hands, the Slim has proven itself to be a steel disc road bike for the modern era. The bet paid off, with resounding success. I want to commend Chris on his patience, his kindness, and the caliber of his work. The entire process, from our first phone conversation to the hours spent in the saddle trying to find words to describe the feel of the bike, have been a wonderful journey, and barely the beginning of what promises to be many happy hours on this bike.
Escape Collective has also done a write-up based on these posts, and it’s worth a read here. Escape is my favorite cycling website, and although paywalled, it’s worth the annual fee for the high quality writing and the lack of advertising.
2 Replies to “Betting on a Slim Chance”
Comments are closed.