
I design things, I always have. For over 30 years I’ve designed architectural lighting and controls, but my over-caffeinated brain doesn’t limit itself to just lumens. While I ride my bikes, I think about the beauty and function of the machines, and what I like, don’t like, and what I wish I had.
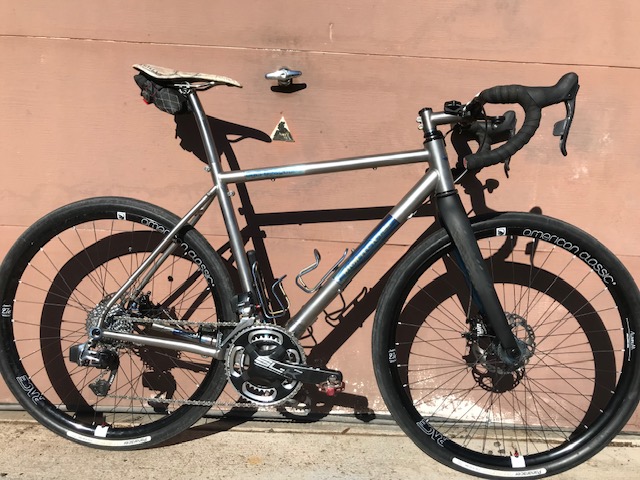
I have designed about 30 road, gravel, and hardtail frames, for my brand as well as individual customers and a small local bike company (RIP). Each frame was tailored to specific parameters, whether performance or fit, and in the designs for myself, a certain degree of experimentation. I happily (compulsively) study bike designs and reviews, and think about tweaks in geometry, handling, features, and more. There are a myraid of websites dedicated to bike reviews, but few dive deep into the design process, so at the risk of revealing my deficiencies, I present the genesis of my latest frame design, the Hell in a Bucket.
Naming products is not easy regardless of industry, and for my bikes, I have the best luck drawing from my favorite music. In 2017, I designed an all-road travel and exploration bike and named it for Donald Fagan’s New Frontier (The Nightfly, 1982). That frame is titanium, and brought to my mind the mid-century optimism of the Space Age. Titanium is the magic metal of the Space Age, and images like rockets, swoopy coffee tables, and the Jetsons seemed like the right direction to follow. The graphics I designed are based in period designs and iconography, some of which recall signs I saw as a child in the 1970s.
The gravel frame I designed as a counterpart to the New Frontier is called I Know You Rider, an obvious call-out to the Grateful Dead. The graphics include a recreation of a ticket stub I found in my desk from the Boston Garden in 1992. Unlike the Garden, the bike is comfortable and sounds great. The frames, along with a very similar one for Mrs. Mamil, were manufactured by Waltly Titanium, and have been excellent bicycles. I designed all 3 frames frames to clear 2″ tires.


For this new design, which would be an XC hardtail tailored for drop bars, the lyric of “I may be going to hell in a bucket, babe, but at least I’m enjoying the ride” seemed to sum up not only the risk of a very sketchy bike, but the fun I would have piloting this bad idea down singletrack. It also stays with the Grateful Dead song theme, and was a much better choice than Unbroken Chain or Going Down the Road Feeling Bad.
While the New Frontier has road-oriented geometry, the Rider shares more in common with older mountain bike geometry: 71/73 head/seat angles and slightly longer chainstays. I did not push the geometry into the progressive MTB range, as it was 2017 and that aspect of mountain bike design was still evolving and had definitely not yet trickled into the drop-bar space. In its pure essense, it was based on the iconic Ibis Hakkalugi and its modern equivalent, the Hakka MX. I changed the top tube length to accomodate my fit, and shortened the stem to 70mm. The bike is a hoot on singletrack, and with 2″ tires it flies down the trail. As good as it is on gravel roads, the bike comes to life when things get narrow, twisty, and rocky. It makes underbiking ridiculously fun, and as a result I’ve been seeking out more and more questionable decisions.
I own a Revel Ranger (V1 – non UDH) for true mountain biking, and while I find it to be a really fantastic bike, literally designed for the trails here in my valley, I also find that I miss having a hardtail. Our trails are dry, with loose grainy soil and square-edged sandstone or river rock. Roots are rare, and we don’t ride in mud because of the damage it causes to the trails. Regionally, we have the legendary Fruita trails, and Crested Butte and Moab are each within a 4-hour drive. Directly across from my house is a trail network in a pinyon-juniper forest with short, sharp climbs and descents in and around redrock geology.
[As a side note, while writing this post, Revel suddenly announced that it’s closing its doors. Their press release didn’t directly say so, but they were killed by the tariff ridiculousness. In a blink, 31 people, many good friends of mine, were unemployed. The day after, Trek and Specialized announced price increases.This is merely the tip of the iceberg, I fear.]
One day, my wife and I headed out for a quick jaunt across the street, and as we rolled out, I realized my Ranger was in dire need of a brake bleed. I turned around and grabbed the Rider. While chasing my wife through the most technical trail I’d ever tackled on drop bars, I realized I was laughing and grinning like a mad man. The capability of the bike surprised me, and my addition of a Reverb AXS XPLR 75mm dropper made the bike really easy to handle on the descents and drops. Because the dropper is actuated by tapping both shifters at once (as is done to activate a front derailleur), this dropper allows you to brake and drop simultaneously. Only one rock garden stymied me, with a steep climb directly into a 90-degree turn stealing any possible momentum and causing me to put a foot down.
The out-and-back trail has 2 significant climb and descent segments, resulting in an M-shaped profile. A few days later, I grabbed the Ranger, and went back and rode it to create a baseline time on Strava. The next day, I returned on the Rider, and was surprised to see I was faster by a bit over a minute on the same trail. Throughout the remainder of the summer, I continued to alternate bikes on that trail, and the Rider was consistently faster. This got my designer brain cells rubbing together, and a hardtail mountain bike began to develop in my mind.
As a lifelong designer, I firmly subscribe to the approach of “amateurs copy, professionals steal”. I researched as many drop-bar big-tired bikes as I could find, and bikepacking.com proved to be a great resource. I found bikes like the Curve GMX+, Bearclaw Beaux Jaxon, and Otso Warakin as great inspiration, and each had aspects that I liked but none completely fit my list of criteria.
My nature is to complicate things, so I also wanted it to be metal and to break down for travel. I really struggled to decide if a 68mm bottom bracket with 100/142 hubs were better for packing versus 73mm/148/110 bottom bracket and mountain bike hubs. Components, such as the SID Ultimate I had on hand determined the front hub, and SRAM Transmission’s 55mm chainline pushed me to MTB dimensions. It’s possible to do 142mm rear axle and 52mm chainline for Tranmission, but sourcing cranks is much more difficult. As I researched componet options, I was pushed farther towards the mountain bike world. This also changed my original idea of flat-mount brakes to post-mount.
My goal was to take XC-race hardtail geometry and match it to my Rider fit points. XC race bikes over the last couple of years have basically abandoned the hardtail, and their geometry has become more progressive with longer top tubes and slacker head angles. I wanted to keep this slightly more conservative, and using BikeGeoCalc, I entered the Rider’s geometry, including component dimensions. Using the Shadow Bike mode, I started plugging in the geometry that had been floating in my head.

Most bike builders use BikeCAD, which is really a nice program with loads of bike-specific stuff, but for this excercise I was focused on raw dimensions and centerlines, so it was more than I needed. Plus, since I’ve spent about 35 years suffering in AutoCAD, it’s hard to change my CAD habits to match a new work process. I played with it a bit, but found that for this part of the process, Bikegeocalc was faster for playing with the geometry.
BikeGeoCalc allows you to enter dimensions for the frame geometry and the components. This is really handy, because you can enter your exact saddle position, crank length, stem size, handlebar reach, spacers, tires, and so forth. You can center the two bikes anchored either at the bottom bracket or ground, and toggle dimension sets on and off. The only limit I see is that it only shows road lever position, it does not account for mountain bars (riser or flat) and backsweep vs reach. Entering a negative reach number just moves the lever graphic back, obscuring the stem and head tube.
My basic parameters of the design were:
-
-
- Progressive XC geometry (long top tube, slack head angle)
- Shallow bottom bracket drop
- Maintain contact points from Rider
- 29×2.6″ tire clearance
- Clearance for under toptube bag above bottles
- UDH
- Coupled frame for travel
-
I steepend the seat angle to 74.5 degrees and played with several head tube angles, and continually adjusted the head tube size and angle, as well as stack and reach, while trying to match the Rider lever and saddle positions. To an extent, it was trial-and-error as I plugged in minor dimension changes and looked at how other dimensions moved. Throughout each iteration, I kept the relative positions of the touchpoints consistent.
I based the bottom of the headset at 505mm axle-to-crown dimension, which reflects a 20% compression of the fork. My target head tube angle is 68 degrees, and in order to maintain top tube standover, I had to make adjustments to the head tube length, while taking into account headset and spacer stacking. Further, in the event I decide to slacken the head angle (for instance, if I switch to flat bars), Wolftooth makes very high quality angle adjuster headsets, so I could change to 67 or 66 degrees without impacting seat tube angle. These headsets do have an exposed bearing race, so that will lift the head tube slightly, but in reality the impact of the 5mm or so will only change the compressed-fork angle by 0.1 degree or less.
My other criteria were a shorter bottom bracket drop to allow for more pedal strike clearance and to aid in lifting the front end, the dimensions of a SID Ultimate 120 fork I bought from my friends at Revel, and my plan of using a top tube bag, which would need to clear water bottles. Further, I wanted to clear 29x 2.6 tires.
Along with this massaging of geometry, my opinion is that the most important number for handling is trail. Trail is a measurement on the ground plane, and the longer it is, steering becomes slower. Race road bikes will have a trail in the range of 50-60mm, resulting in quick steering, while gravel and mountain bikes stretch longer, in some cases approaching 100mm.
Trail can be a hard concept to wrap your head around, so let’s review: draw a line throught the head tube to the ground, at the head tube angle (basically, the center of the steerer tube). Now draw a vertical line through the axle, perpendicular to the ground. The vertical line intersects the ground aft of the head tube line. This vertical line moves closer or farther to the head tube line based on the fork offset (also called rake).
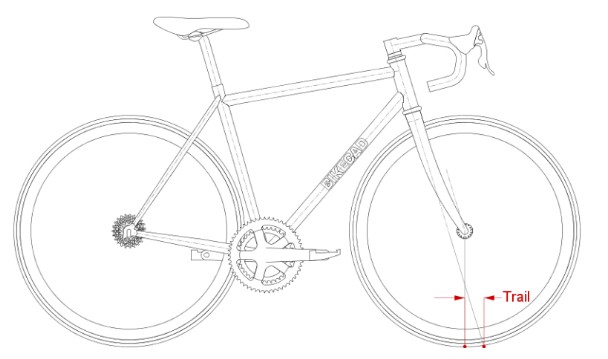
A shorter offset moves the vertical line farther aft from the head tube line/ground intersection, resulting in longer trail, while a longer offset shortens the trail. This can be confusing because it means a 44mm offset has a longer trail and slower steering than a 51. Another factor is tire diameter- this raises the axle center, making the triangle larger, resulting in longer trail. Thus, a 45mm gravel tire has a shorter trail than a 2.4″ tire on the same bike. In this case, 45mm offset is 88mm trail, while a 51mm offset is 81mm of trail. The SID Ultimate 120 has 44mm offset. In this case, I ended up with my trail being 88mm.

The Rider gravel bike has pretty short trail of 54 (very quick & agile but not twitchy), versus my Ranger, which has 92mm. So, based on this, the Hell will turn slower than the Rider, but faster than the Ranger. In gravel and MTB, longer trail leads to a more stable handling on dirt, meaning the bike tracks more predictably. The cost can be in tight steering situations, such as on tight singletrack switchbacks (like older trails, not newer flow-designed trails).
The next critical dimension is Front Center, or the distance from the center of the bottom bracket to the front axle. Longer FC will result in a bike that tracks longer and wants to “carve” into a turn, while a shorter FC is a “turnier” bike.  The Rider has a 620mm FC and is very quick steering, it’s easy to whip around twisty singletrack, but it is more work to hold an arc-shaped line on loose gravel. The Ranger’s FC is 762mm, and in big, sweeping turns, it rails around in a predictable and solid manner. The Hell in a Bucket has a FC of 711, so close to middlin’ between the other two bikes.

The trail and FC of the Hell shown on paper indicates a quicker steering mountain bike, but not as quick as the gravel bike. For comparison, the Revel Rover gravel bike has a FC of 625 and trail of 63, so slightly longer and more stable than the Rider. My Slim Chance has a FC of 593 and trail of 54, and has a very “classic” road bike feel- quick, but not quite twitchy, fast steering.
In order to balance the bike, a longer Rear Center was needed. Also known as Chainstay Length, this is the distance from the center of the bottom bracket to the rear axle. As the FC increases, it puts the rider’s center of mass aftwards, which can lighten the front of the bike and make the steering feel vague. Additionally, larger tires will push this dimension out in order to clear the tire circumference. Some designs use bent seat tubes to acheive this, but in my design, 450mm stays provided enough clearance at both the seat tube and chainstay-bottom bracket area for 2.6″ tires.
The next challenge was to decide on the seat tube length and top tube height. I wanted space for a bag and 2 large bottles, but had to balance that with standover and a relatively short pair of legs. Ideally, I would be able to put both feet on the ground without my bike trying to divide and conquer my parts. My plan was also to include a 175mm SRAM Reverb AXS dropper, so I had to read the specs and figure out where the seatpost would sit in the design. The seat tube bottle bolts would determine the lowest the dropper could insert, and I know the distance from my saddle rails to the center of the bottom bracket, and I also had to look at the distance from the bottom of the seatpost collar assembly to the rails and make sure that it was at the correct height. Thus, the length of the seat tube to the top edge was a very critical dimension so that I did not end up with a seatpost that was too tall at full extension. Once I did the math, I realized the 175mm seat post was a no-go, and switched to the 150.
In order to make sure there was clearance for a top tube bag and Fidlock connectors, I drew the bottles in and made sure I had about 3″ of space above them. There are top tube bags on several of my other bikes, and I really like being able to stuff things into them.
The top of the head tube and top of the seat tube were pretty important with regard not only to standover, but also to my desired position on the bike. Since I wanted to have my hands, feet, and tuchus in the same position as my gravel bike, the height of the headset cups, spacers, stem clamp, and overall assembly of the front end of the bike mattered significantly. Very short stems rarely have an offset, so unlike a longer stem with 6-degree rise, the bars would be very close to the steerer with no added rise. Bikegeocalc allows you to adjust dimensions of the head tube without moving the crown race position, and it will move the top tube to match.
So, without question, I had drawn a mountain bike that happened to have a short stem and funny-looking handlebars. After untold hours of pondering and revising, I settled on numbers I thought would work. I continued to digest and study the numbers, and kept an eye out for new bikes that might be similar. Within a week of being nearly settled on my numbers, the Salsa Cutthroat was released with remarkably similar geometry to mine. So, either I was getting close to something that would work, or Salsa had really blown it.
At this point I was ready to contact Waltly Titanium and discuss ordering a frame. I have had several frames made by Waltly, and I have been very happy with each. The language barrier can be a challenge, but fortunately drawings and numbers don’t require much translation. That said, though, you must go through the drawings very carefully and check each number and detail. I sent the deposit, and within a few days they sent back a drawing for review.
The only challenge I had was convincing Waltly that I wanted a vertical sleeve through the seat stay bridge so I could attach a Go-Pro mount for a tail light. Even through this bike is intended for use on dirt, not pavement, the addition of mounting points is easy and can’t hurt anything. I skipped pannier, rack, and fender mounts because if I needed a rack, I’d just use my Tailfin AeroPack, which clamps to a seatpost and axle with spindles. Waltly offered headtube engraving, so I worked up a 13-point bolt in CAD and sent it as a .dxf file.
Once we got that detail settled down, I released it for production and waited for delivery. In the meanwhile, it was time to think about graphics. I played with various icons of the Grateful Dead, from dancing bears to Steal Your Faces. I came up with several ideas, and like the geometry, rolled it around my head and experimented with concepts.
I really wanted to try to create a tie-die pattern in anodizing, and I tried it out on some scraps, but never really settled on a method I liked. Instead, I decided to do spirals of bears and Faces around the downtube.

I also peeled the factory stickers off the SID’s stanchions, and replaced them with my own version of the logo.

Eventually, Brown Santa dropped off a box at the house, and I unwrapped the new frame. Since I knew I would need to do a full polish before anodizing, I told Waltly to leave it raw. If it was sandblasted, I would have more polishing, and I could save some money by having them skip it. It showed up really raw, with black marker notes, scratches, tubes with clean ends and scruffy middles, and a thin coating of dust and oil.

Image from Waltly’s shop
It took some time, but after lots of polishing and buffing, then surface preparation, masking, anodozing, bead blasting, and so forth, I finally had a frame and was ready to hang parts on it. The selection and specification of the parts is another essay unto itself, but suffice to say, it was as deep and convoluted as the geometry.
So, after all of this effort into design, finish, and assembly, once the snow melted and the trails were dry enough, the time had come to test it. A quick road ride on it verified all bolts were tight, brakes were bled and bedded properly, and the shifting was dialed.
When I first hopped on, because I had been very careful to duplicate my position from the Rider, the bike felt immediately familiar, so I was able to think about the trail ahead and not sore or uncomfortable points. The bike climbed very well, I had sort of forgotten how much I like the responsiveness of a hardtail when a quick acceleration is needed to get up something steep.
52cm wide drop bars didn’t actually feel narrow – in fact they’re wider than the flat bars with bar-ends I rode in the late 80s and early 90s. Winding uphill on a twisty trails through the trees was really fun, and I rode a couple of switchbacks better than on my Ranger. The steeper head tube, shorter trail and wheelbase help make the bike easy to bring around tight turns.
Once pointed downhill, though, it sprang to life. It felt very balanced front-to-rear, and the sweet spot position ended up being with the saddle all the way down and gently resting the backs of my legs against it. My hands stayed on the hoods (the D1 Force AXS shifters have very tall pommels and I very rarely get down into the hooks unless it’s ridiculously steep), and the bike felt very swoopy through the twisting descents. It leaned over into turns and tracked very well, as I settled in I found I could roll it and lean it very far over in the apexes of the turns. On the exits, as I straightened it up, it accellerated out and was ready to rail into the next turn. On its first dirt test, without trying, I was matching my fastest speeds on a trail I’ve ridden hundreds of times. In short, I was ecstatic, and the bike was riding better than I could have hoped.
I did not feel that the 68-degree head tube and 88mm trail were too steep and twitchy as had been my fear. Instead, it cornered very well in slower twisty sections, and when let loose at higher speeds, felt very stable. There was no wheelbarrow flopping on steeper climbs, and it rolled over rocks and chunk very well, despite this being a “steep” angle by today’s mountain bike standards. I’m not convinced being slacker would be more fun, and I think it might get really weird with drops.
My geometry and design are nothing new or ground breaking, but they are exactly what I wanted. The long hours and burned brain cells paid off in a bike that is fun, lively, and a pleasure to ride. While my Ranger will still be in the quiver for bigger rides where full suspension is critical, this bike is a singletrack monster that makes the trails fun. At the time of this writing I’ve logged a bit over a hundred miles, and I keep being surprised at what I can ride on it. I have managed to run out of talent and hit the ground, that was entirely due to poor line choice and not because I was taking a drop bar bike where it shouldn’t be. While I could easily swap out the handlebars and brakes for a flat bar setup (all hoses are external, and the task could be done in an hour or less), I doubt I’ll ever feel the need to do that- the bike just feels too good as it is.
If anything, it will relegate the Rider back to gravel duties rather than being the faux mountain bike it was becoming. I love that bike and have many rides planned for it that will include singletrack, but the Hell in a Bucket will be the first one out the door for days on trails.