My regular reader knows I have a weak spot for cycling in Spain. As I’ve gained experience in the country, I’ve started to figure out how to do my own self-guided tours.
Self-guided tours are pretty cool. There are many well-respected companies who will structure a tour for you, make hotel reservations for you, move your gear nightly, and more. Programs like this can often save 25-50% or more over a guided tour, and allow you the flexibility to travel at your own pace instead of with a group of people you haven’t met prior to the ride. While there are excellent tour companies who provide both fully-guided and self-guided tours, I am a chronic DIY kind of guy.
I’ve designed multiple bikes, spent decades repairing and upgrading my house, fabricated endless questionable items based on bad ideas, and basically have always marched to my own drum. I’ve done some self-guided trips with friends, such as riding King Alfred’s Way and making our own 300-mile loop around the Colorado Rockies during the depths of the Pandemic. I even survived a week showing a posse of MAMILs around Girona, which made juggling cats look like child’s play. We all survived, despite a few crashes and significant damage to our livers.
Like many of the ramblings on this site, this post is targeted at the process, rather than a specific trip. My reader knows that I think there’s a lack of practical advice on the internet about travel by and with a bike- lots of sites tell you that you can travel, but few give you the information on how.
So, without further ado, let’s dive into the methodology I use to put together a cycling trip.
I: Traveling Partners
It’s a well-known aphorism that you can’t choose your family, but you can choose your friends. With this in mind, seek out a group of like-minded people who share your love of cycling and travel. I recommend carefully selecting a spouse who not only wants to ride and explore, but also puts up with your bullshit. In my case, when Mrs. Mamil and I first started dating, she saw my nascent bike collection (one each mountain and road) and said, “cool bikes.” On the spot, she approved the concept of owning multiple bikes, and liked them. This is certainly a solid point in the Win column. She later cemented the deal by making the most delicious apple pie ever created, and ever since then things have gone along quite well. We’ve ridden, traveled, raised a cyclist child (who occasionally will put up with riding with us), and have dispatched same to college, allowing us to travel and ride at our own pace.
In the event you don’t have such a spouse, you most likely have friends, some of whom may be crackpot enough to be entertained by your questionable ideas. These people may be part of your cycling community, associates, colleagues, or random strangers. You decide: this is a choose-your-own-adventure kind of thing. That said, I recommend you don’t select high-maintenance partners in adventure unless you enjoy grinding your teeth.
2: Route Selection
This is the fun part, where you begin your research about a place (or places) you want to visit. The internet has vast resources, most of them a shallow veneer, but they can give you some ideas, images, occasional travelogues, and so forth. Some touring companies have detailed descriptions of their offerings, and these can often act as the seed for your route.
As you sketch together routes, either based on existing ones you’ve found or creating your own, there are some tools that can be invaluable. Google Maps, Strava, Map My Ride, Komoot, and more can provide good guidance, and some features like Maps Street View are really handy. I lean heavily on Strava’s mapping function because its Heat Maps can show where the more popular, and presumably better, routes are. Strava’s system is far from good, and it’s still not really possible to sort or group routes into categories. Maybe someday, someone will figure out how to use computers to sort data, and then Strava can give it a shot.
Often times I will select a starting point and ending point, and let Strava create a route based on the Heat Maps. Once that is created, I add specific points to adjust the route to avoid problematic areas (steep climbs, downtown cores) and emphasize spots I am interested in (gentle climbs, bars, restaurants). The route creation tool also shows a section, so you can see where the climbs are, estimated ride time, total amount of climbing, and so forth. Once created, you can export a .gpx file.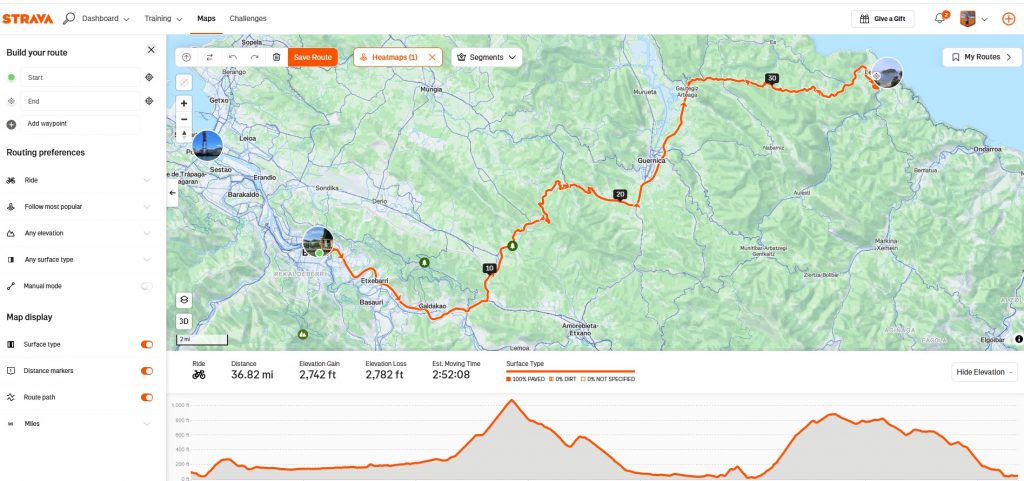
The .gpx file then can be imported to an on-bike computer or converted to a .kml file and imported into Google Earth and Google Maps. Once you’ve brought it into Google, the Street View lets you see the route and determine if you need to make adjustments. Using this technique allows you to ‘spot check’ locations on the route, and get a good sense of what you’re getting yourself into.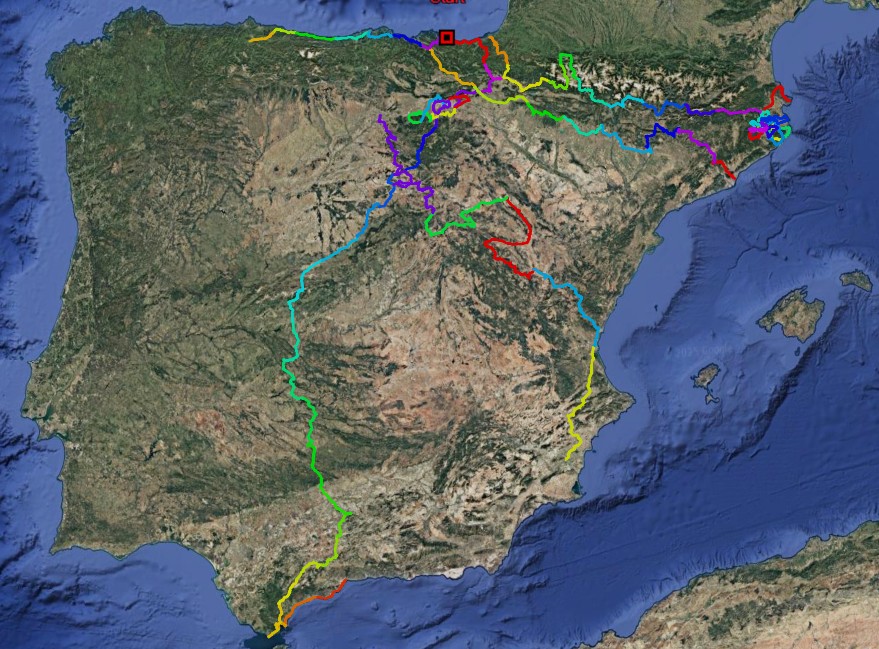
Now, of course it’s possible to pretty much steal routes from tour companies, but this has some questionable ethical issues. These companies need that data and routes to have a product to sell, and by taking that info for your use without buying their services, you’re not helping them out at all. The flip side is that you may look at the routes more closely and decide you want them to make your hotel reservations and move your gear daily after all.
Other sites, like Camino del Cid, have everything there for you to download, from .gpx files to hotel and restaurant lists, and passbooks you can use for discounts along the way. That site is pretty cool and has mountain, road, gravel, moto, and car routes, totaling about 1800 miles between Burgos and Valencia, and it’s worth reading through.Unlike a guide service, this is a tourism promotional project, intended to bring people off the beaten tracks and into some remote areas of Spain.
A major consideration is the daily route length. Since we’re carrying an extra load and are in no great rush on our trips, estimating an average of 10mph for the route is reasonable. Adding in cafe stops, explorations off the bike, adding or peeling layesr of clothing, etc. can make a 35 mile ride take 5 hours or more, but that’s OK when you consider you will load up and start riding before a 10AM checkout, and you most likely can’t check in until 3 at the earliest. So, allowing yourself 6 hours to enjoy the ride at a comfortable pace and feeling free to stop at any time for as long as you want, makes the days much mor eenjoyable.
In the case of the trip Mrs Mamil and I are about to embark on, I did loads of research and based the route on a combination of Strava Heat Maps and descriptions from multiple websites. I then took those as rough guidance, and tailored each stage to be relatively consistent in length and climbing day to day. From there, I used online travel sites like Booking.com and Expedia, Travelocity, etc. to identify hotels in the towns at the end of each stage.
Once I had a good correlation of towns, distances, and hotels, I could make hotel reservations and edit the route files to the exact addresses of the start and stop for each day. Quick checks on Street View then allowed me to see the hotels and neighborhoods so that I know what to look for.
3: Gear Selection
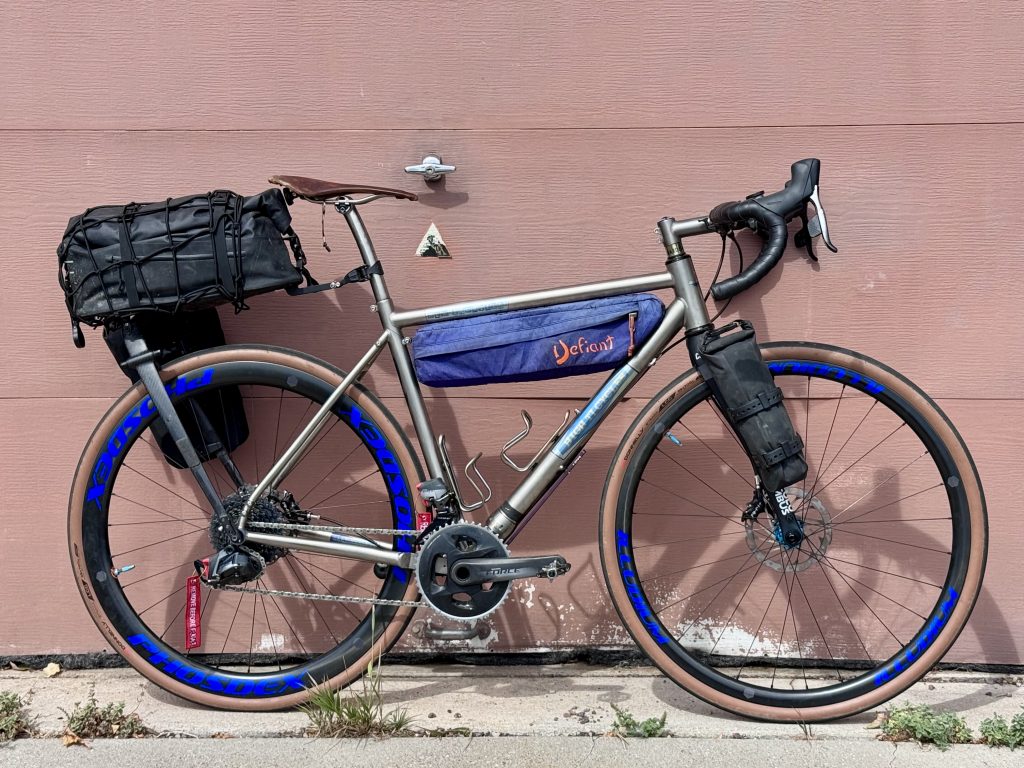
Bike: Start here, because otherwise, you’re on a hiking trip. Or bus. Whatever. Make sure it fits, has attachment points, is comfortable, tuned, has good tires, a freshly lubed chain, running lights, fresh bar tape or grips, fresh tubeless tape, etc. Basically, you want to start off with a clean, fresh, well-tuned machine. If you aren’t a bike mechanic and DIY freak, make an appointment at your LBS with enough time to get the bike back for a test ride and ample pre-departure packing time.
Gearing matters. Your bike will be carrying more gear (in my case, about 12-14lbs) and is definitely less aero when you put big panniers or bags on. I’m our most recent trip, Mrs. Mamil wanted SRAM 33/46 chainrings and a 10-36 cassette, which with her 32c tires, gave her about 24.8 gear inches in her lowest gear. I used my gravel bike, with a 12/52 cassette, 40 chainring, and 35c tires for 20.9 gear inches. On that trip, most of the climbs ranged from 4-10%, so we both were pretty comfortable, but on an 18% pitch, she mentioned (through clenched teeth) certain opinions about gearing, the grade, and my choice of routes.
Touring bikes have traditionally been longer, lower, and slacker, and with good reason. If you have a gravel bike with current geometry, you probably fit into the envelope of touring geometry. If not, well, N+1.
Bags & Racks: Traditional style racks, frame bags, bar bags, saddle bags, and so forth offer a wide range of options, from standard to custom-fit on your bike. Each system has advantages and disadvantages, but these will change depending on your trip. If you’re camping, you need a sleeping bag, stove, pots & pans, food, and more, so you need more capacity. If you’re going hotel-to-hotel, you can get away from many bulky items and lighten the load (and wallet).
I, for one, prefer to not sleep on the ground. As a child and well past my college years, I spent untold days and nights backpacking and spending time in the wilderness. It brought many adventures, hardships and pleasures, and was always rewarding, even if much of it was Type II fun. No matter what, though, I was always happy to head back out and do it again.
As time went by, I noticed a couple of things: preparing for camping and putting it all away afterwards takes more time than the trip itself; and that due to geological processes, the earth’s crust is significantly harder than it was in the 1970s and 80s. I have come to the conclusion that sleeping is not supposed to hurt. Also, modern science has yet to create an air mattress that doesn’t go flat overnight.
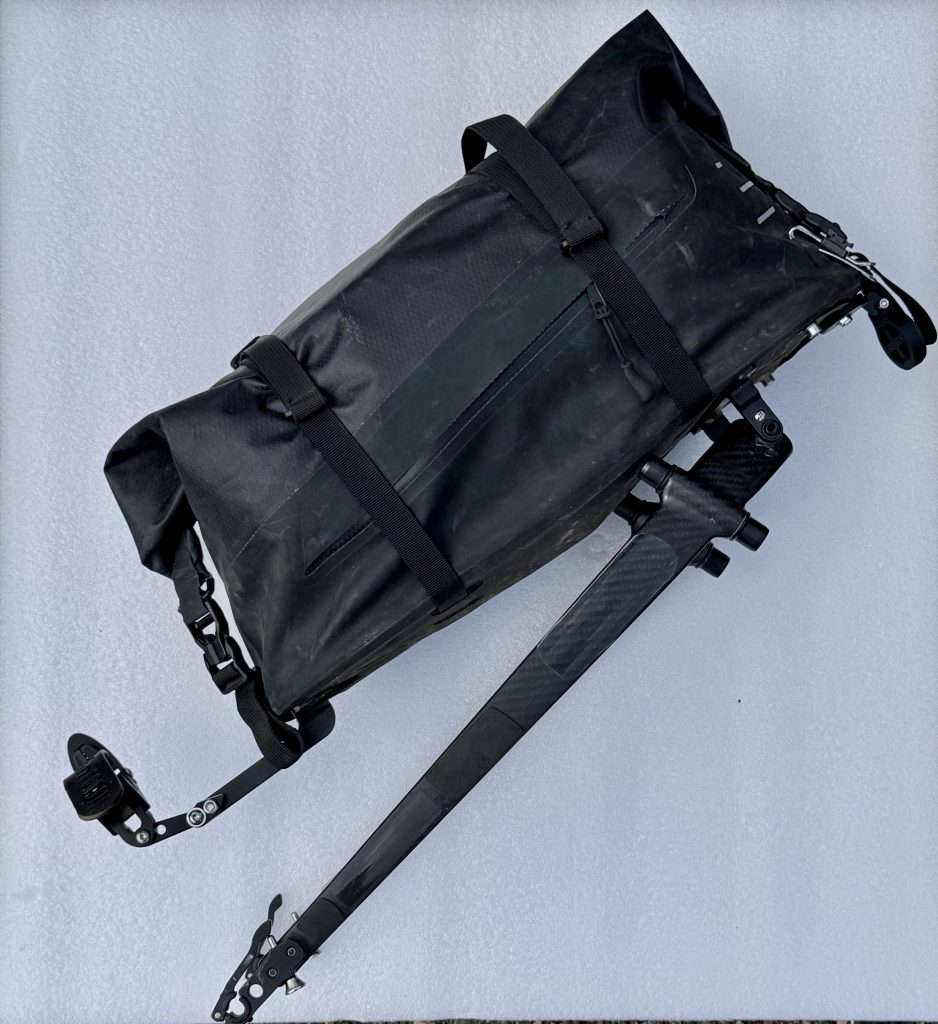
My preference for packs starts with Tailfin. I bought (and reviewed) their Kickstarter Tailfin AeroPack, and it’s honestly one of the best purchases I’ve ever made. I’ve used it on several trips, and it rides on my fatbike all winter. It has elegant design and excellent functionality. There are 2 basic arch designs to pick from: with pannier nubs or with 3 bolt points. The quick-release system works wonders, and can be installed or removed in seconds. It has proven handy in places where the bike stayed in a locked bike room that was separate than the hotel room, I was able to pop my gear straight off the bike while my riding partners dug into their panniers and fussed around. Mrs Mamil and I have one of each, so based on the load and requirements, we have options on what system we want to use. The Tailfin system is excellent, but spendy. Remember though, you get what you pay for.
Our travel bikes have forks with triple mounts on them, so we can also carry small loads up front. This helps balance the bike and keep the handling feeling more “normal”, although there’s no mistaking the added mass of the gear. These mounts add flexibility and the ability to tailor the load for the trip and the expected terrain.
Other options include handlebar bags, frame bags inside the main triangle, bento/gas tank bags on top of the top tube, flared saddle bags, etc. which will help you fit everything on the bike and help balance the load. It is definitely worth your while to pack all your gear (the actual stuff you’re taking), load the bike, and go ride it. Climb, descend, find a headwind. Go home, adjust the load. Repeat. Do this well in advance of your trip and things will be much smoother. The same goes for packing: I’ve said it before and I’ll keep repeating it – “DO NOT PACK THE NIGHT BEFORE YOU FLY.” Practice, practice, practice.
Clothing: Clearly, this is up to you to decide what you want, but I can guarantee one thing: you will take more than you need and vow next time to take less (and inevitably, you won’t). Of course, locations, seasons, anticipated weather, and so forth will have a major impact on your choices, but listed below are the items I take along.
I bring pretty minimal stuff, basically 3 day’s worth of clothing that can be ridden in and worn around town. This isn’t a fashion show, it’s all about practicality. Washing kit is easy enough by either scrubbing it in the sink and/or shower, or using a new modern invention: the laundromat. Note: the items shown here do not include one full kit (bibs, base layer, socks, cap, shirt or jersey, which are presumed to be in use on day 1). This allows for a total of 3 full kits which can be washed and rotated through.
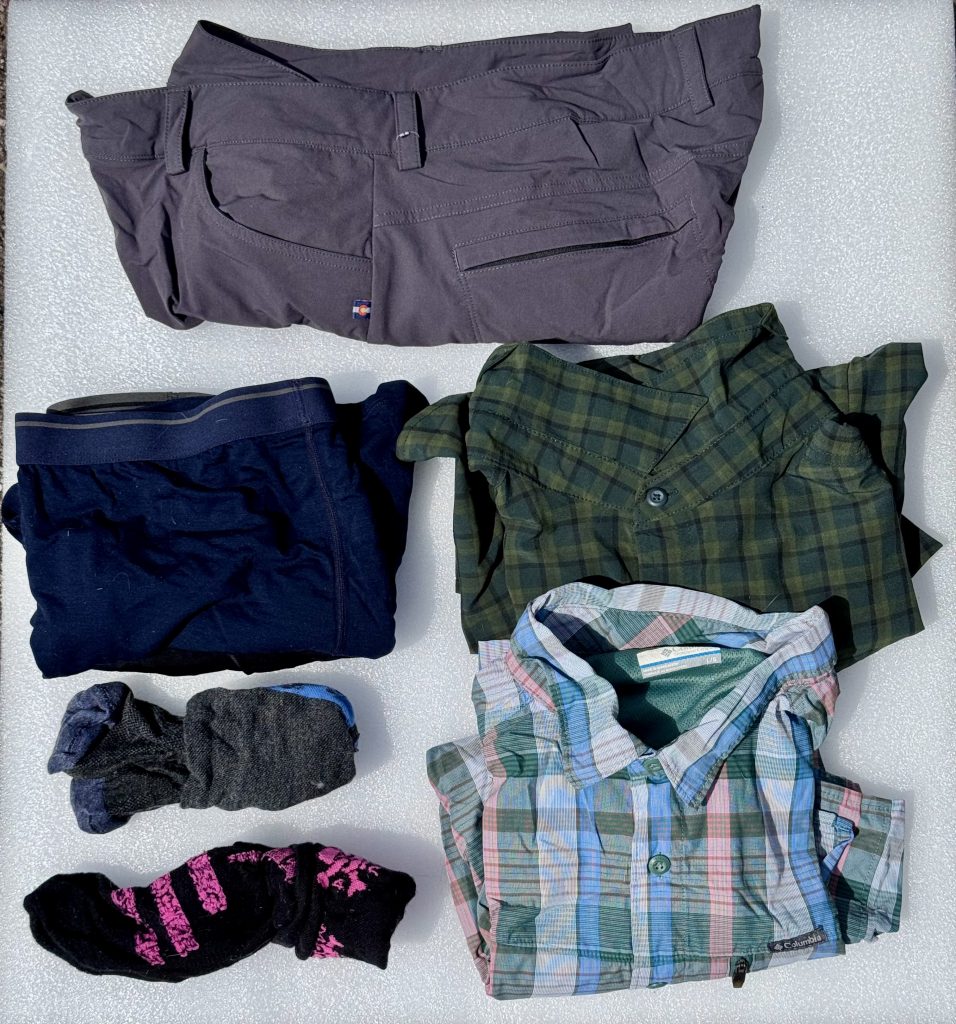 2 shirts, 2 pairs of Merino socks, 2 pairs of Merino wool underwear, 1 pair of shorts. The Columbia shirts are inexpensive, comfortable, dry fast, and breathe well. They can be used both on and off the bike. I like to ride in one, wash it, then the next day, wear it post-ride and then for riding the day after, thus rotating them through. Merino is lightweight, comfortable, and does not get ripe like polypropylene can. I usually take one traditional bike jersey, although there’s is a significant aero penalty to the bags on the bike, if a day has a huge headwind, reclaiming any bit of aerodynamics will help.
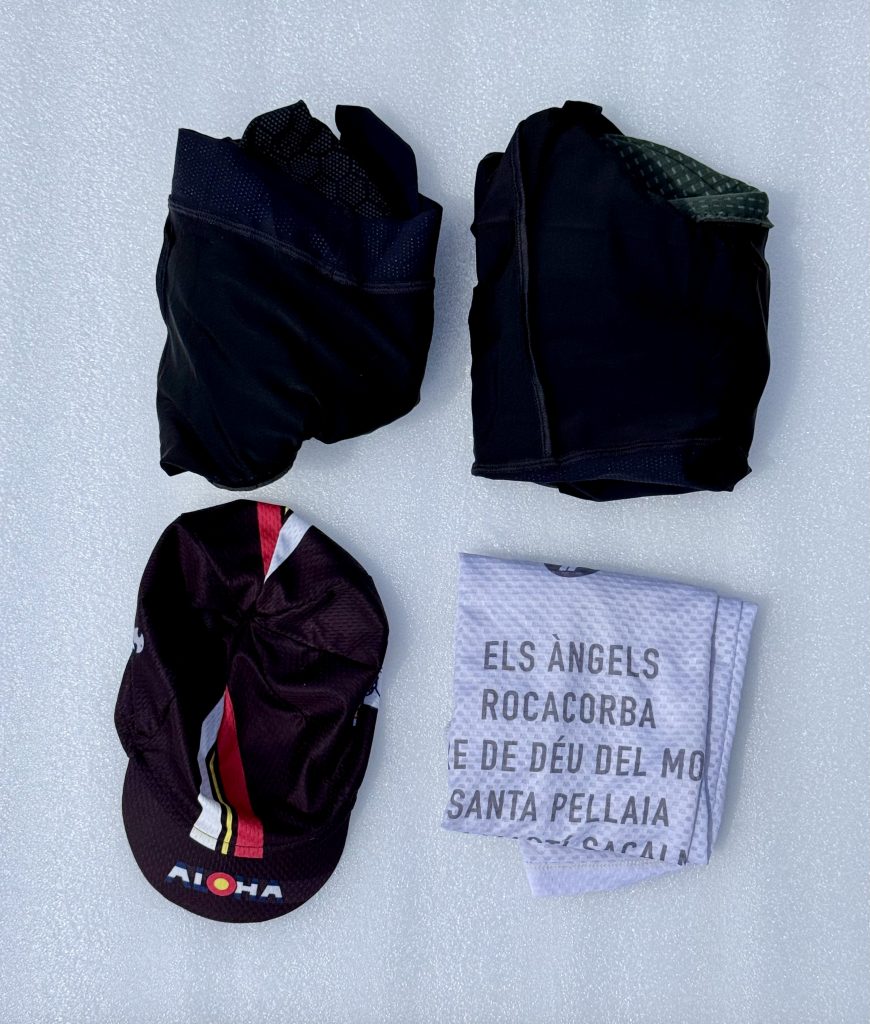 2 bibs, 1 cap, 1 base layer. Although there are 3 kits, the base layers and caps dry quickly enough you don’t need 3 of each. Roll the bibs up nice and tight, then fold one leg over in the same manner as socks to pack them small.
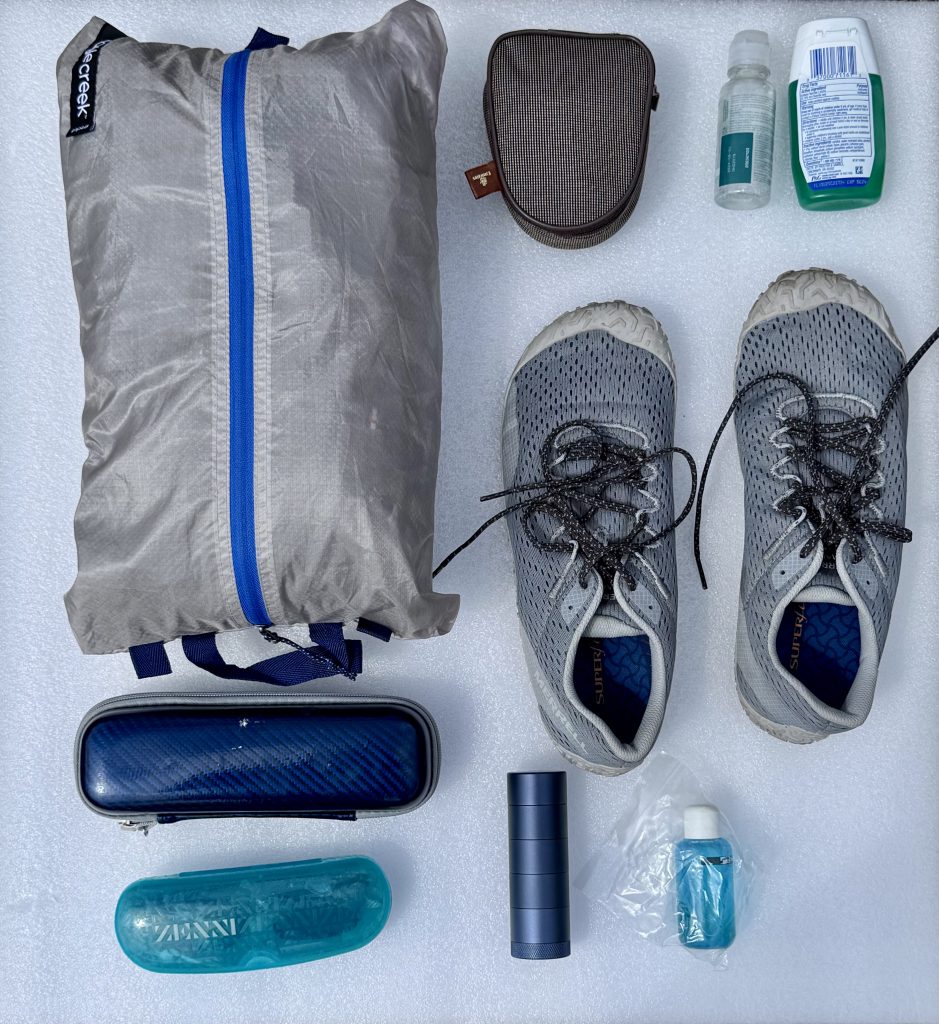 Toothbrush kit with USB charger, eyeglasses, toothpaste, deodorant, contact lens case, Assos kit wash in 1oz bottle, all clothes in an Eagle Creek shoe bag, which fits nicely in the Tailfin. The Merrell Vapor shoes are allegedly for running (I don’t even run crossing the street. I could use the time off and the drugs), they fit EEE width feet nicely and weigh about 6oz (170g) each. I add cushioned insoles and they’re great for travel, walking around cities in search of tapas and beer, and pack easily. My cycling shoes (not shown, because they won’t be packed in the ride kit) are mtb shoes, not road shoes. I like coffee stops, but road cleats on marble coffee shop floors make you do a Bambi-on-ice skitter and dance, and hot espresso on your hand sucks. I’m experimenting with cleated enduro-style shoes that have a flat rubber sole instead of lugs. For the last few months I’ve been testing Lake MX201s, and have been happy. They’re almost comfortable enough to be the only shoes on the trip. Wide, roomy (like a small condo, or at least well-appointed studio apartment for your foot), and well-vented, I’ve tested them extensively and am quite pleased.
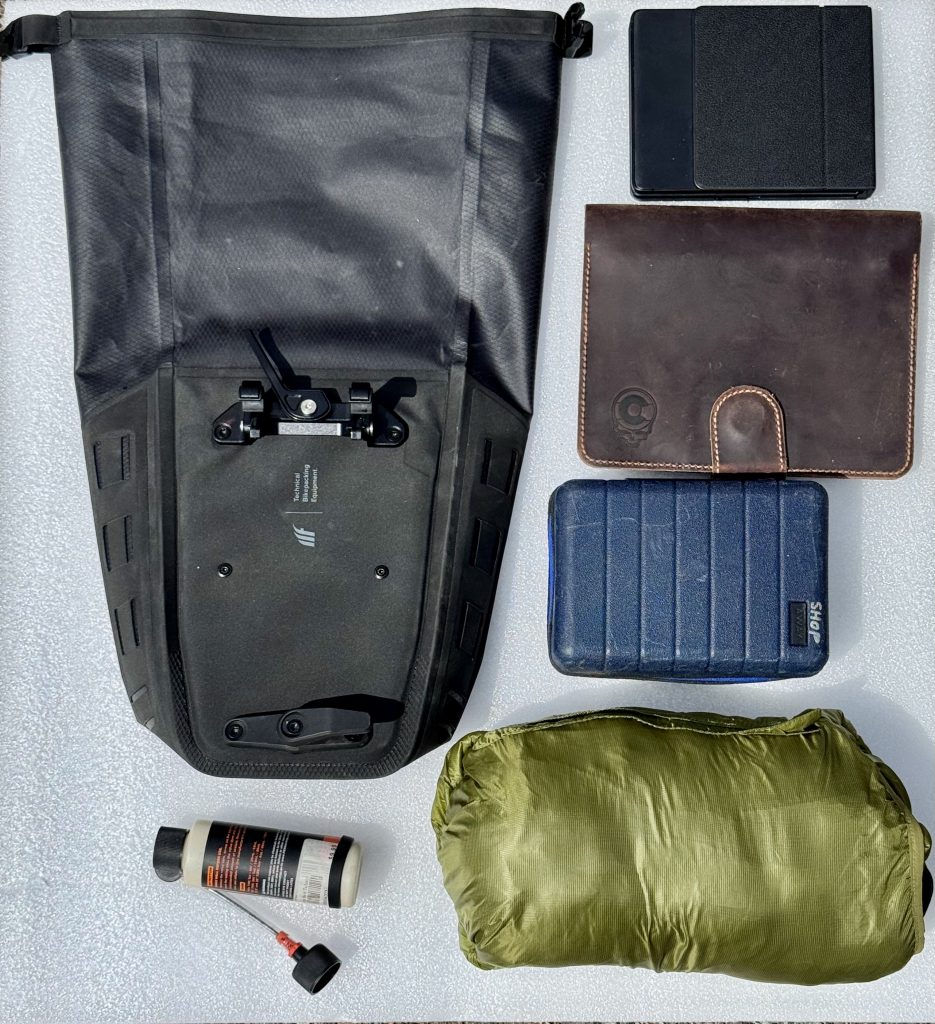 Toolkit (bike shop-in-a-box), iPad Mini, keyboard, 4oz tire sealant, Patagonia Nanopuff, all in a Tailfin 10 liter pannier. The toolkit is the heaviest part at 2.2lbs (1kg) but I can pretty much rebuild the bike. It has spare bolts, brake pads, Boa dials, a bleed kit, torque wrench, and more (see here for more info). The iPad mini is easier on my eyes than a phone for writing this drivel, and the keyboard is a very handy (and lightweight) convenience.
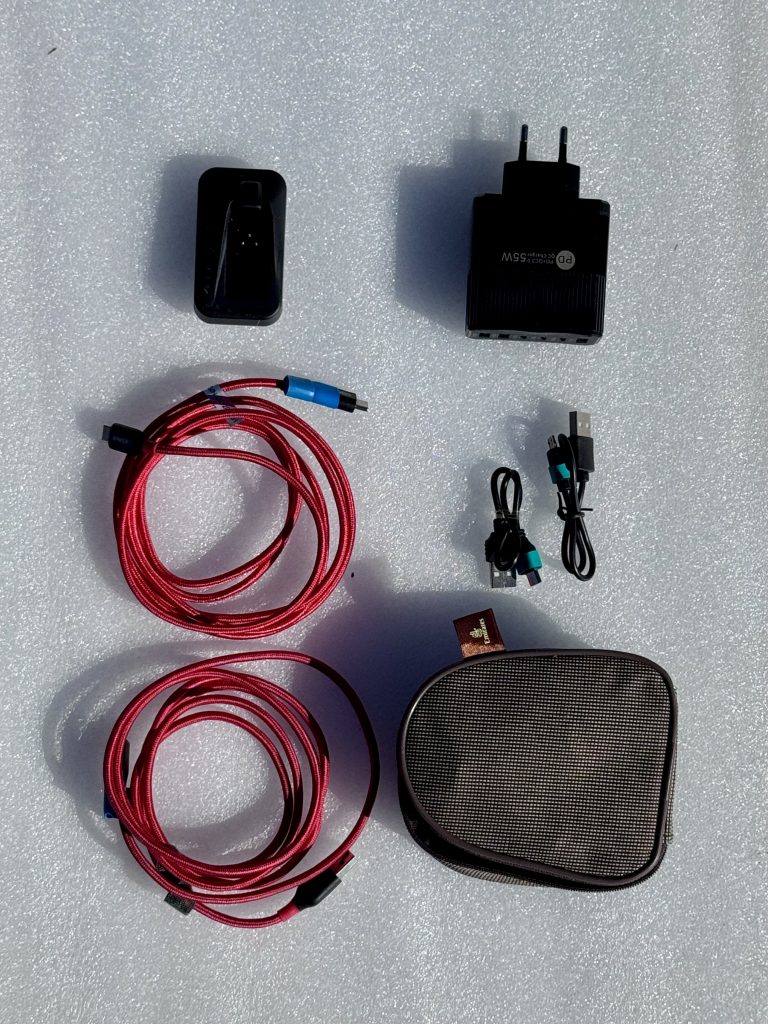
6-port USB-A & C power supply, USB-C cords, USB-micro cords for charging phones, lights, radar, bike computers, etc. Plus a charging cradle for AXS batteries. Sadly not everything is USB-C, lots of Garmin, Bontrager lights, and AXS stuff is still USB Micro.
![]() Fork-mounted Tailfin 1.7 liter bag, with Gore Shakedry (in red pouch), vest, Buff, gloves, and wool arm warmers. This bag is mounted on the fork for quick access if the weather goes to shit. Being from Colorado, we pretty much expect snow any day of the year, and we know how to deal with it.
Fork-mounted Tailfin 1.7 liter bag, with Gore Shakedry (in red pouch), vest, Buff, gloves, and wool arm warmers. This bag is mounted on the fork for quick access if the weather goes to shit. Being from Colorado, we pretty much expect snow any day of the year, and we know how to deal with it.
 Loaded Tailfin Aeropack., ready to go. Everything, including shoes, fits in these 3 bags, total weight 11.2lbs (5.08kg). I also have a stretchy cargo net that wraps around the AeroPack in case I need to tuck wet clothing on the outside to let it dry during the ride. Not shown: lightweight fold-up shopping bag and packable backpack. We used the shopping bag to hold extraf food and gear under the cargo net, it was invaluable. Packed, it’s about the size of a big marker pen. The backpack stuffs into a fist-sized ball, and in spring or fall, it’s great for tossing a coat inside while walking aound off the bike. It also served as my carry-on during the flights.
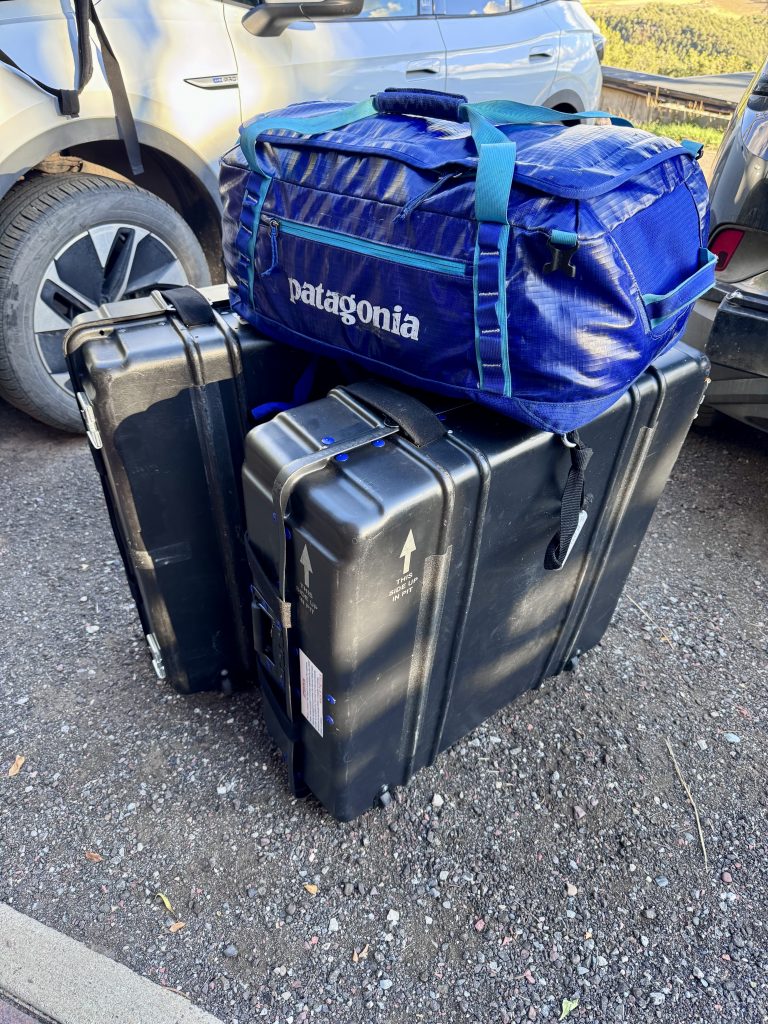 For our most recent trip, Mrs. Mamil and I have 8 days of riding and 5 days exploring without bikes. We packed the Tailfin packs, panniers, gear, and street clothes for the non-riding part of our DIY tour into 2 bike cases and a single Patagonia 50 liter duffle (plus small carry-ons). Even though that’s pretty efficient, I know damn well there’s stuff in that purple bag we could do without.
4. Lodging
In reality, this is one of the easiest parts. I use Google Maps and a booking website to find hotels in the start & stop locations of each day’s ride. Sometimes the most appealing hotel is in a different town,if so, I simply edit the route. Once the reservation has been made, I typically edit the toutes to the hotel’s addresses and look at Street View so I have a sense of what to look for when rolling in at the end of the ride. Keep in mind not every hotel is bike friendly, but you can use different websites for noted hotels that are good with bikes.
5: Transportation, Cases, & Luggage
Obviously, by this I mean actually getting to where the adventure starts. In this case it’s planes, trains, and automobiles, or whatever it takes to get to your starting place. I like trains because they tend to get you to central locations, are pretty comfortable, generally reasonably priced, and are a nice alternative to flying. That said, however, your case selection can ahve an impact. Some trains won’t let you take an unpacked bike, some limit bikes to specific cars, and some have maximum size regulations on suitcases. To date, I’ve been fine with breakaway-size cases (nominally 28″x28″x10″), but even these relatively small cases can sometimes be hard to fit on train luggage racks. If going by rail, it’s important to check ahead on baggage size regulations.
Another thing to consider is the bike case and regular luggage while you are doing your ride. If you’re doing a loop, you can often arrange with yout hotel to store your case until you return, or you can find a luggage delivery service to move it to the end of your route. A friend turned me on to this when he was riding El Camino de Santiago. I asked how he was dealing with his bags, and he said, “People have been traveling this pilgramage for about 1,500 years. Don’t you think someone has figured out how to make money moving luggage by now?” Solid logic, that. Many hotels, however, are quite small and have limited space, so if you’re more than a day or 2 out, check with courier companies and see if they can hold the case at a warehouse and delay delivery until your arrival. Basically, do your homework.
So now, here you are, making it to the end of another long-winded post about how to make travel with a bike somewhat less mysterious and daunting. Now it’s time to get busy researching your trip, from routing to lodging to gear. You probably have a lot to do at home, so use your time and company resources wisely, and do as much of this legwork as possible while you’re at work. After all, your productivity isn’t going to shatter itself.